After two decades as a master mechanic, I’ve seen head gasket failures that were misdiagnosed as major engine damage—and vice versa. This thin, unassuming component is the linchpin of engine integrity. It doesn’t just “seal”—it manages extreme pressures, temperatures, and fluid flows. When it fails, the symptoms can mimic other issues. This guide cuts through the noise with diagnostics, repair logic, and real-world insights to help you fix it right the first time.
Core Functions of the Head Gasket
The head gasket’s job is threefold: seal combustion pressure, keep coolant and oil in their lanes, and maintain alignment between the block and head. It’s not a wear item—but when it fails, the consequences are severe.
1. Sealing Combustion Pressure
Each combustion event generates over 1,000 psi and temperatures exceeding 5,000°F. The gasket’s fire ring—made of steel or copper—contains this energy within the cylinder bore.
Leakage here causes power loss, overheating, and exhaust gases in the cooling system. A common misdiagnosis is a valve or ignition problem when compression is uneven.
2. Sealing Coolant and Oil Passages
The gasket routes coolant from the block to the head, maintaining thermal balance across the combustion chambers. It also seals oil passages that feed the camshafts and valve train.
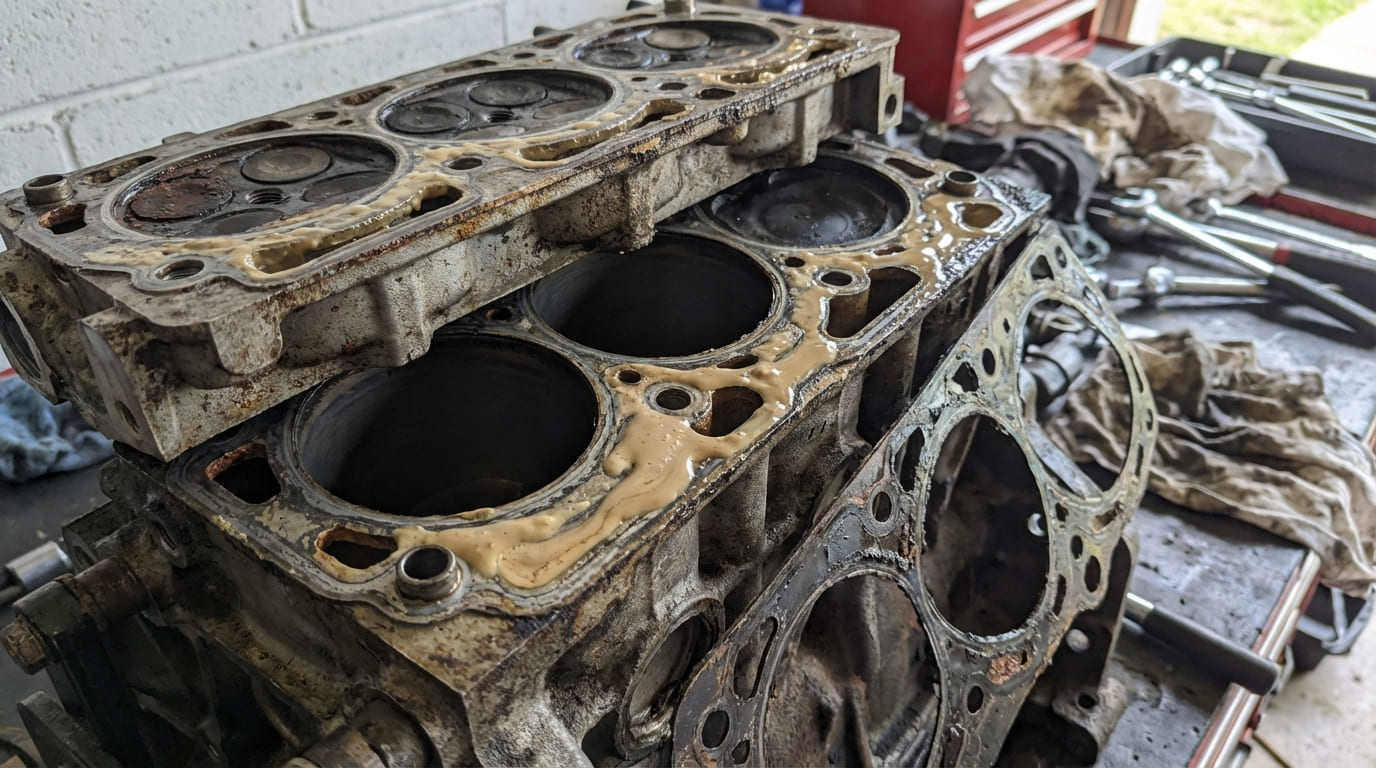
If coolant enters the oil, you’ll see milky residue. If oil gets into coolant, sludge forms in the radiator. But don’t assume it’s the gasket—other components can cause similar symptoms.
3. Maintaining Precision Alignment
The gasket ensures coolant, oil, and cylinder bores align perfectly between the block and head. Even minor warpage (0.002″ or more) can break the seal, especially on aluminum engines.
On turbocharged or high-compression engines, gasket thickness affects compression ratio and heat dissipation. Consistency matters.
How to Diagnose Head Gasket Failure
Don’t rely on one test. Use a combination of visual checks, chemical tests, and mechanical measurements.
Step-by-Step Diagnostic Checklist
- Check for white exhaust smoke – Persistent white smoke (not just at startup) suggests coolant burning in the cylinder.
- Inspect the oil – Milky oil on the dipstick or under the oil cap may indicate coolant contamination.
- Examine the coolant – Sludge in the radiator or reservoir? Oil may be leaking into the cooling system.
- Look for bubbles in the overflow tank – With the cap off and engine running, bubbles suggest combustion gases entering the coolant.
- Perform a block test – This chemical test detects hydrocarbons in the coolant. A positive result confirms combustion leakage.
- Conduct a compression or leak-down test – Low or uneven compression between adjacent cylinders often points to a gasket breach.
- Pressure test the cooling system – Hold at 15–18 psi for 15 minutes. A drop indicates a leak—could be gasket, radiator, or water pump.
In my shop, we never replace a head gasket without first testing the cylinder head and block for warpage. I’ve saved customers thousands by finding a warped head instead of assuming a blown gasket.
Head Gasket Types and Where They’re Used
Material choice depends on engine design, temperature, and pressure. Using the wrong type leads to premature failure.
| Type | Construction | Pros | Cons | Common Applications |
|---|---|---|---|---|
| Multi-Layer Steel (MLS) | 3–5 layers of spring steel with elastomer coating | High crush resistance, excellent thermal stability | Less forgiving of surface imperfections | Ford EcoBoost, GM LT, Toyota Dynamic Force |
| Composite | Fibrous material with steel core and rubber coating | Conforms to minor surface flaws, lower cost | Degrades under sustained heat, prone to outgassing | Older V8s, 1990s 4-cylinders |
| Copper | 0.062″ annealed copper sheet | Reusable, excellent heat transfer | Requires O-rings for combustion sealing | Race engines, turbocharged builds |
When rebuilding a performance engine, I always use a copper head gasket with O-ringed bores. It’s more work, but the seal is bulletproof under boost.
Installation: Critical Best Practices
Over 60% of head gasket failures I see are due to improper installation. Even a perfect gasket won’t survive incorrect torque or dirty surfaces.
Must-Do Steps
- Clean both block deck and cylinder head with a non-abrasive gasket remover. Any residue affects clamping force.
- Check flatness with a precision straight edge and feeler gauge. Replace or resurface if warpage exceeds 0.002″ (0.0015″ for aluminum).
- Use new torque-to-yield (TTY) bolts. Reusing them reduces clamp load by up to 30%.
- Follow the factory torque sequence in stages—usually 50% torque, then 75%, then angle-tighten (e.g., 90°).
- Use a calibrated torque wrench. A 10% error can cause warping or gasket crush.
Common Mistakes to Avoid
- Never use RTV silicone unless the factory specifies it. Excess can break off and clog oil galleries.
- Don’t re-torque TTY bolts after engine operation. They’re designed to stretch once and hold.
- Avoid impact wrenches on head bolts. They deliver inconsistent torque and risk over-tightening.
I once had a tech reuse head bolts on a Subaru. The engine ran fine for 800 miles—then lost compression on two cylinders. The bolts had relaxed, and the gasket blew. Lesson: TTY bolts are single-use. No exceptions.
Costs and Repair vs. Replace
Head gasket replacement is labor-intensive. Know the numbers before you commit.
| Component | Part Cost | Labor Hours | Total Estimate (Shop Rate $120/hr) |
|---|---|---|---|
| MLS Gasket Kit | $80–$150 | 8–12 | $1,040–$1,590 |
| Composite Gasket Kit | $40–$80 | 6–10 | $760–$1,280 |
| Copper Gasket + O-rings | $200–$400 | 12–16 | $1,640–$2,320 |
If the head is warped, add $150–$300 for resurfacing. If the block is cracked or porous, replacement may cost more than the vehicle’s value.
For high-mileage engines (150k+ miles), consider: Is a full rebuild more cost-effective? If other components (water pump, timing chain) are near end-of-life, bundling repairs saves labor.
Real-World Failure Scenarios and Lessons
Situation: 2012 Honda Accord with white smoke and overheating. Previous shop replaced thermostat and radiator.
Diagnosis: Block test confirmed exhaust gases in coolant. But when I pulled the head, the gasket was intact. The head was warped from prior overheating.
Lesson: Combustion in coolant doesn’t always mean a blown gasket. Always check head flatness before assembly.
Situation: 2007 Toyota Camry with milky oil cap. Owner feared head gasket.
Diagnosis: No other symptoms. Oil and coolant clean. Valve cover showed moisture—just condensation from short trips.
Lesson: Not every milky residue means disaster. Rule out driving habits and environment first.
Situation: 2015 Ford F-150 EcoBoost losing coolant. Previous gasket job failed in 3 months.
Diagnosis: New bolts, correct torque. But block deck had 0.003″ warp. MLS gasket couldn’t seal over the high spot.
Lesson: Perfect assembly fails if components aren’t flat. Always inspect block and head surfaces.
Bottom line: the head gasket is often the victim, not the cause. Overheating, poor maintenance, or improper repair create the conditions that kill it. Fix the root cause—or you’ll be doing the job again.