In my two decades as a shop foreman, few mechanical failures command the same level of dread as a connecting rod letting go at speed. It’s not just a broken part—it’s the start of a mechanical chain reaction that can leave even seasoned techs shaking their heads. What follows isn’t speculation; it’s what I’ve seen in the bays, on the tow trucks, and under the hoods of engines that didn’t make it home.
Immediate Mechanical Events of Connecting Rod Failure
Connecting rod fracture and displacement
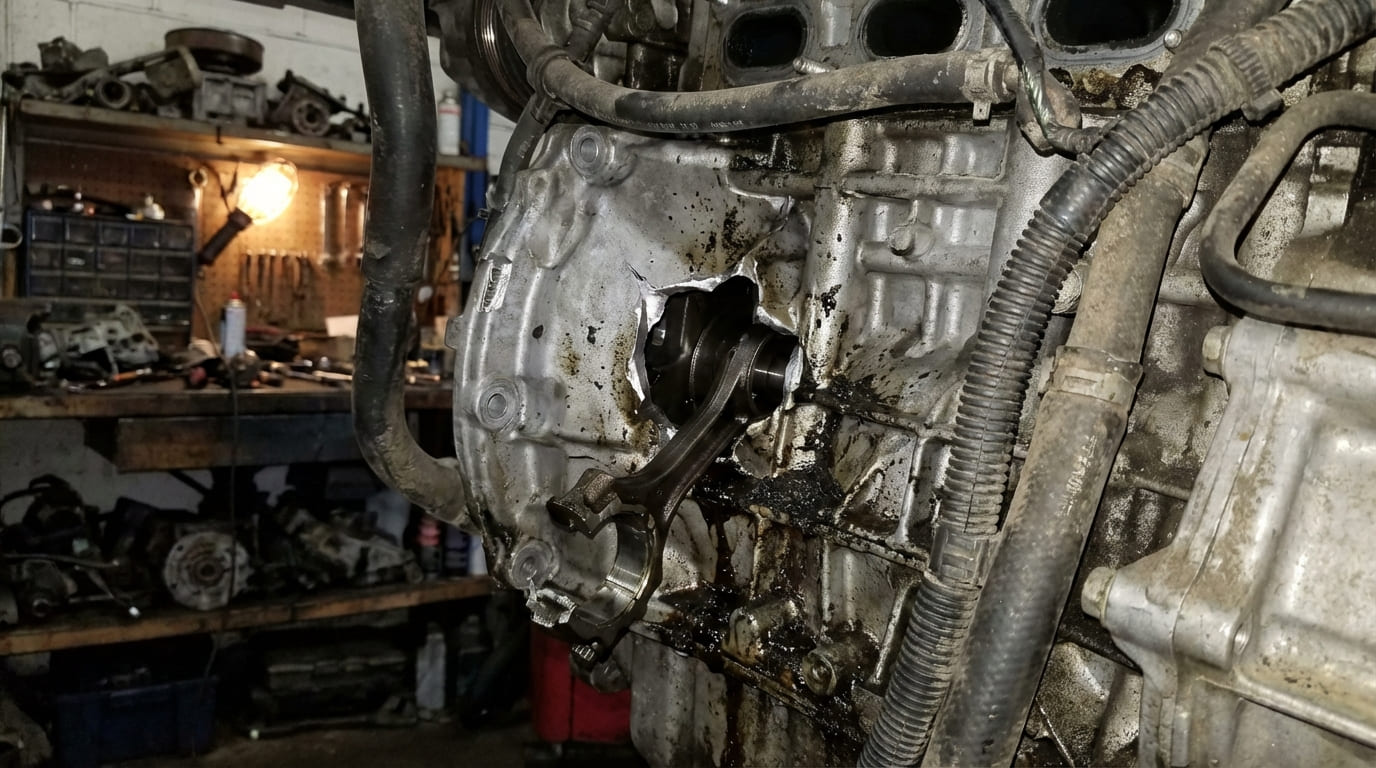
When a rod fails, it typically separates at the beam or at one of the bearing ends—the big end (crankshaft) or small end (piston pin). Most often, fatigue from repeated stress leads to a crack that suddenly propagates. Once the rod breaks, it becomes a high-speed projectile inside the crankcase, swinging with enough force to hit other rods, the crankshaft, or the engine block.
How to check: If the engine seized suddenly and won’t turn, do not force it. Remove the oil pan and inspect for loose metal fragments or a disconnected rod. Use a bore scope through the spark plug hole to check for piston position and cylinder wall damage.
Piston-to-valve contact and cylinder wall damage
Without the rod controlling its motion, the piston can travel too far up into the combustion chamber. In interference engines—nearly all modern engines—this causes contact with open valves, bending or breaking them. The piston or rod may also cock sideways and gouge the cylinder wall, especially on the thrust side.
If the rod punches through the side of the block, oil sprays under pressure. This is a fire hazard if it contacts hot exhaust components. Aluminum blocks are more likely to rupture than cast iron.
In my shop, we always assume valve damage in interference engines after a rod failure. Even if the piston looks intact, remove the head and inspect every valve for bending or stem damage before considering repair.
Secondary Component Damage Cascade
Crankshaft, head, and oil system damage
The flailing rod often strikes the crankshaft, damaging journals or counterweights. Even if the crank looks okay, it may be bent or have hidden cracks. Magnaflux testing is essential for any rebuild. The cylinder head frequently suffers bent valves, cracked guides, or deck warping—especially in turbocharged engines where pressure spikes add stress.
The oil pan is often torn open by the swinging rod, causing immediate oil loss. This leads to rapid seizure of any remaining rotating parts. Check the oil pump pickup screen during teardown—debris or low oil level may have contributed to the failure.
Turbocharged engines face added risk. Once oil pressure drops, the turbo bearings fail within seconds. Inspect the turbo for play or grinding. If the compressor wheel shows impact marks, assume it ingested debris.
Always replace the oil filter and flush the oil cooler lines after a rod failure. Metal shavings travel through the entire system, and reusing contaminated parts guarantees a repeat failure.
Immediate Vehicle Behavior and Driver Experience
Drivers often describe a sudden “gunshot” under the hood, followed by violent shaking and power loss. Here’s what to expect:
- Loud metallic bang or explosion: The first sign. May be followed by rhythmic knocking if the rod is partially attached.
- Severe vibration: Feels like the engine is tearing itself apart. Not a smooth misfire—this is violent and mechanical.
- Loss of power: Engine may run for a few seconds but will stall quickly.
- Smoke or fluid trail: Blue-gray smoke means burning oil; white smoke suggests coolant leak. Check under the car for oil pooling or spray patterns.
Immediate Driver Action
If this happens while driving, your priority is safety and preventing further damage.
- Signal and pull over safely. Use momentum to get off the road.
- Turn the ignition off immediately. Do not coast or attempt to restart.
- Do not crank the engine again. Even one revolution can destroy salvageable components.
Repairability Assessment
Repair feasibility depends on the extent of damage. Use this guide to evaluate options:
| Damage Level | Typical Causes | Repair Feasibility | Technician Consideration |
|---|---|---|---|
| Catastrophic block breach | Rod exits block, main web cracked, coolant passage compromised | Not repairable | Even with welding, structural integrity is questionable. Risk of recurrence too high. Replace engine. |
| Internal damage, block intact | Broken rod, damaged crank, scored bore, bent valves | Possible, but labor-intensive | Full teardown required. Check for hidden cracks in crank and block. Often more cost-effective to swap engine ($2,000–$4,000 for used long block vs. $4,000+ in labor and parts). |
| Single rod failure, minimal collateral | Isolated fatigue, no block breach, crank undamaged | Rarely repairable in practice | Theoretically fixable, but disassembly often reveals more damage. OEM service policy often recommends replacement. |
Common Precursors and How to Diagnose Them
Lubrication failure and bearing damage
Low oil level, clogged pickup, or worn bearings are leading causes. Check oil level and condition first. If oil is dark, gritty, or low, bearing wear likely preceded the failure. Inspect rod bearings during teardown—spun bearings show misaligned shells or blue discoloration from overheating.
Cost note: Replacing rod bearings alone costs $800–$1,500 in labor. But if the crank is scored, it adds $500–$1,200 for regrinding or replacement.
Over-revving and detonation
Missed downshifts or aggressive tuning can overstress rods. Check ECU logs if available—many modern cars record RPM spikes. Detonation from low-octane fuel or carbon buildup creates pressure spikes that fatigue rods over time. Look for pinging under load and inspect spark plugs for erosion or melting.
Hydro-lock
Water entering the intake—especially through a modified cold air intake—can cause immediate rod bending. If the car was driven through deep water, suspect hydro-lock. Remove spark plugs and crank the engine to check for water expulsion.
Manufacturing or assembly defects
Rare, but possible. Inspect failed rod for forging marks, uneven grain, or subsurface flaws. If a rod bolt broke, check torque history—under-torqued or over-torqued bolts are common culprits.
Always use new torque-to-yield (TTY) rod bolts. Reusing them risks improper clamp load and future failure. I’ve seen engines fail within 5,000 miles due to reused bolts—even if they looked fine.
Best Practices: Do and Don’t
- ✅ Recommended: Clean oil gallery threads with a bottoming tap before installing main or rod bolts. Prevents false torque readings and ensures proper clamp load.
- ✅ Recommended: Use a micrometer to measure rod bore alignment and journal finish before reassembly. Misalignment as small as 0.0015″ can lead to premature bearing failure.
- ✅ Recommended: Check oil pump pickup screen and volume during teardown. A clogged screen could have contributed to the original failure.
- ⚠️ Avoid: Reusing torque-to-yield (TTY) rod bolts unless the service manual explicitly allows it. In my experience, most don’t, and reused TTY bolts can fail at lower clamp loads.
- ⚠️ Avoid: Assuming the crankshaft is reusable just because it “looks okay.” Journal microfinish and roundness matter. I’ve seen cranks that polished up fine but failed again in 10,000 miles due to subsurface stress.
- ⚠️ Avoid: Skipping a post-rebuild oil pressure test. Run the engine on a priming tool and verify pressure builds quickly and holds steady.
Situation: A 2012 turbocharged 4-cylinder came in after a sudden shutdown on the highway. Driver heard a bang and saw oil spraying from under the car.
Initial Assumption: Classic thrown rod—oil pan was torn open, and the engine wouldn’t turn over.
Deep Dive/Discovery: During teardown, we found the rod was intact. Instead, the oil pump drive gear had sheared, causing the oil pressure to drop. The real damage? The connecting rod bearings had spun due to oil starvation, and one rod cap bolt had broken from fatigue.
Nuanced Lesson Learned: Not every catastrophic failure starts with the rod. Always trace the root cause—sometimes the rod is a victim, not the culprit.
Situation: A customer insisted on rebuilding a V8 after a rod failure. The block looked mostly intact, no external breach.
Initial Assumption: Replace crank, rods, pistons, and bearings. Save the block and heads.
Deep Dive/Discovery: After align-honing, we found the #5 main bore was misaligned by 0.003″. Further inspection revealed a hairline crack in the web that wasn’t visible externally. Pressure testing confirmed leakage.
Nuanced Lesson Learned: Visual inspection isn’t enough. Even if the block doesn’t look broken, structural integrity must be verified through measurement and testing.
Situation: A high-mileage diesel engine failed with a loud knock. Towed in, no oil pressure.
Initial Assumption: Rod bearing failure due to wear.
Deep Dive/Discovery: The rod was broken, but the bearing showed even wear. Closer look at maintenance history revealed the oil hadn’t been changed in over 15,000 miles. Oil analysis showed high silica content—dirt ingestion from a faulty air filter.
Nuanced Lesson Learned: Contamination can kill an engine just as fast as neglect. Always consider intake and filtration when diagnosing bearing-related failures.
While some say rod failure is random, I’ve found that most have a backstory—low oil, missed maintenance, or a moment of mechanical stress that exceeded design margins. The key isn’t just fixing what broke, but understanding why it broke. Always consult the factory service manual for torque specs, tolerances, and inspection criteria specific to the engine you’re working on—what applies to one block may not hold true for another.