Diagnosing a Faulty VVT Solenoid
Before cleaning, confirm the VVT solenoid is the actual issue. Many symptoms mimic solenoid failure, but the root cause may be elsewhere in the oil or timing system. Follow a systematic diagnosis to avoid unnecessary work.
How to Check: Step-by-Step Diagnosis
Start with observable symptoms: rough idle, poor fuel economy, cold-start ticking, or a check engine light. Then proceed with targeted tests:
- Scan for DTCs: Use an OBD2 scanner. Codes like P0010–P0024 point to camshaft timing issues. But don’t assume the solenoid is bad—these codes indicate a timing error, not a failed part.
- Inspect engine oil: Pull the dipstick and check oil condition. Sludge, dark thick oil, or metallic particles mean poor maintenance. On 70% of the VVT-equipped engines I see, dirty oil is the real culprit.
- Test electrical circuits: Disconnect the solenoid and use a multimeter:
- Measure resistance: Most solenoids read 6–15 ohms. Out of range? Internal coil failure—cleaning won’t help.
- Check voltage: With key on, engine off, verify battery voltage at the connector.
- Test ground: Resistance from ground pin to chassis should be under 0.5 ohms. High resistance points to wiring issues, not solenoid failure.
- Perform actuation test: Use a fused 12V jumper or bi-directional scan tool. Listen for a crisp click. A weak or inconsistent response suggests internal varnish or sludge.
- Inspect the solenoid and bore: Remove the solenoid. Look for debris, damaged O-rings, or a stuck plunger. Also check the bore in the cylinder head—foreign particles here can re-clog a cleaned solenoid.
Repair vs. Replace: When to Clean
Cleaning is only viable if:
- Electrical tests pass (resistance and voltage are good)
- Plunger moves slightly but binds
- Oil is dirty or sludgy (indicating contamination)
If resistance is out of spec, the plunger is seized, or the housing is cracked, replace the solenoid. Cleaning a mechanically failed unit wastes time.
Cost note: A new OEM-style solenoid costs $50–$120. Cleaning takes 20–30 minutes and costs under $10 in supplies. If oil quality is poor, cleaning is a low-risk first step—but only if electrical function is intact.
In my shop, we never clean a solenoid without first verifying oil condition and electrical function. More than once, a “bad solenoid” turned out to be a corroded connector or sludge from 10,000-mile oil changes.
Tools and Materials Needed
Use the right tools to avoid damage and ensure a clean, safe job:
- Sockets and wrenches (typically 8mm, 10mm)
- Non-chlorinated brake cleaner or electrical contact cleaner (never carb cleaner—it eats seals)
- Compressed air (regulated to 30–50 PSI)
- Lint-free cloths
- New OEM-spec O-rings or gasket
- Clean engine oil (for lubricating seals)
- Safety glasses and nitrile gloves
- Digital multimeter
- Fused 12V jumper wire (2A fuse recommended)
Removal and Cleaning Procedure
Work on a cool engine. Disconnect the negative battery terminal to prevent electrical shorts.
Locate the solenoid—usually on the cylinder head or valve cover. Some V6 engines have two (one per bank). Refer to a service manual for exact location.
Disconnect the electrical connector by pressing the lock tab. Inspect pins for corrosion. Remove the mounting bolt (typically 8–10 Nm). Gently twist and pull the solenoid free. If stuck, use a rocking motion—do not pry.
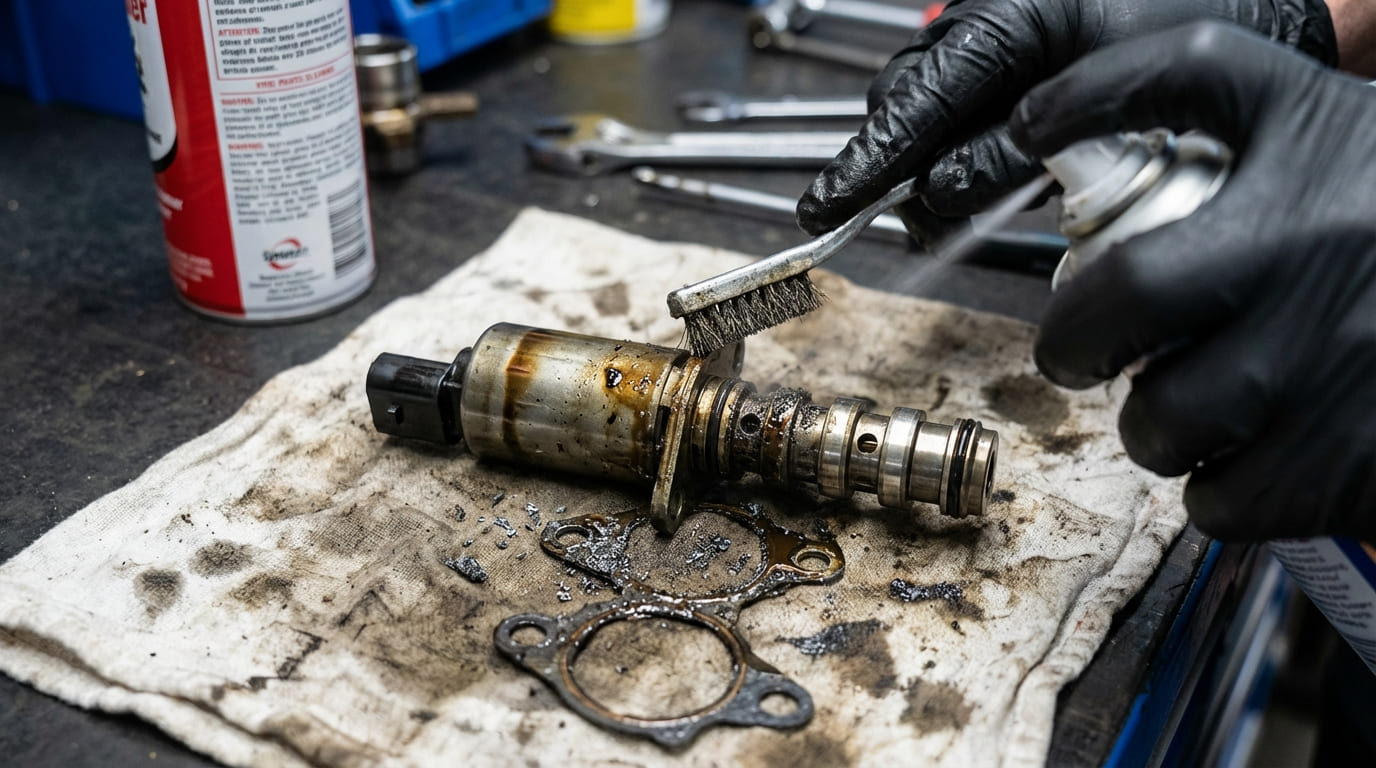
How to Clean the VVT Solenoid
Follow these steps for effective cleaning:
- Inspect visually: Check for cracked housing, broken filter screens, or a completely seized plunger. If any are present, replace the unit.
- Flush with solvent: Spray non-chlorinated brake cleaner into all openings, especially the screen and oil passages. Let it soak for 1–2 minutes.
- Actuate during cleaning: If the plunger is accessible, press it gently while spraying. For electric solenoids, apply 12V (fused) and cycle it 5–10 times to free internal spool valves.
- Blow dry with compressed air: Use short bursts to clear all passages. Ensure no moisture remains—especially in blind holes. Wet solenoids can cause hydraulic lock or corrosion.
- Repeat as needed: On heavily clogged units, repeat flushing and actuation 2–3 times until solvent runs clear.
- Final inspection: Verify the plunger moves smoothly and returns fully. Any binding means it may not function under oil pressure.
Reinstallation and Verification
Use new O-rings—reusing old ones is the #1 cause of post-repair oil leaks. Lubricate them with clean engine oil before installation.
Align the solenoid and seat it fully before tightening. Torque the bolt to spec—usually 8–10 Nm. Overtightening can crack the solenoid or damage aluminum threads.
Reconnect the electrical connector and battery.
How to Verify the Repair
Clear DTCs with a scanner. Start the engine and listen for smooth operation. Check for oil leaks around the solenoid.
Take the vehicle for a road test that includes acceleration and moderate load. This engages the VVT system.
Use a scan tool to monitor live data: compare actual vs. desired camshaft position. Variance should be within ±5 degrees under normal conditions.
After the drive cycle, rescan for pending codes. If codes return immediately, check oil pressure—many VVT systems require at least 35 psi to function.
On a 2014 Camry with recurring P0011, the owner replaced the solenoid twice. I found sludgy oil and a clogged filter bypass valve. After a flush, oil change, and cleaning the bore, the new solenoid worked. Lesson: Fix the oil, not just the part.
A 3.5L F-150 had P0022 and poor throttle response. The solenoid cleaned fine, but oil pressure was only 28 psi at 2,000 RPM. The real issue? A worn oil pump. Cleaning was a temporary fix—hydraulic pressure is critical for VVT operation.
A 2012 Accord had ticking and P0010. The solenoid clicked off-car, but the code returned. Found a metal shaving in the bore. Cleared it with compressed air. Moral: Always inspect the head’s oil gallery—debris there will re-clog any solenoid.
Prevention and Best Practices
Cleaning is a fix, not a long-term solution. Prevent recurrence with these steps:
- Follow OEM oil change intervals (typically every 5,000–7,500 miles)
- Use correct viscosity and API-rated oil (especially critical in cold climates)
- Install high-quality oil filters with anti-drainback valves
- Consider an engine flush only if sludge is confirmed—and use a mild formula
Do’s and Don’ts
- ✅ Clean threads with a tap before reinstalling bolts—especially in aluminum heads. Prevents galling and ensures accurate torque.
- ✅ Use OEM or high-quality O-rings. Cheap rubber hardens and leaks.
- ✅ Test oil pressure with a mechanical gauge if VVT issues persist. Electrical tests don’t catch hydraulic problems.
- ⚠️ Avoid reusing torque-to-yield bolts unless specified. They’re designed to stretch and can fail if reused.
- ⚠️ Avoid carburetor cleaner. It degrades internal seals and varnish-coated coils.
- ⚠️ Avoid skipping electrical checks. A bad ground or wiring fault mimics a stuck solenoid.
Common VVT Issues and Root Causes
| Symptom | Most Likely Causes | Less Common but Possible | Diagnostic Priority |
|---|---|---|---|
| Intermittent P0011/P0021 | Sludge in solenoid, low oil level, incorrect viscosity | Failing oil pump, stretched timing chain | Check oil condition and circuit first |
| No click during actuation, normal resistance | Internal spool valve binding, debris in bore | ECU driver circuit issue | Remove and inspect solenoid |
| Continuous rattle at startup | Worn cam phaser, low oil pressure | Defective solenoid not holding pressure | Verify oil pressure and phaser condition |
| P0016/P0017 (cam-crank correlation) | Timing chain stretch, jumped timing | Solenoid stuck open/closed affecting phaser | Inspect timing marks and chain tension |
In over 20 years as a master technician, I’ve found most VVT solenoid failures are symptoms, not causes. Oil neglect is the real enemy. Always diagnose the system—not just the part. And always consult the service manual: torque specs, resistance values, and oil pressure requirements vary by engine. What works on a 4-cylinder Camry may destroy a V8 Mustang’s VVT system.