Replacing engine mounts is a common repair that can range from a straightforward DIY job to a complex, shop-intensive task. The total cost depends on your vehicle, the type of mounts, labor accessibility, and whether additional components need attention. This guide breaks down real-world pricing, diagnostics, repair feasibility, and expert tips to help you make informed decisions—whether you’re tackling it yourself or hiring a pro.
Total Estimated Cost Range
The total cost to replace engine mounts typically runs between $200 and $2,000+, depending on the vehicle and number of mounts replaced. This includes parts, labor, and potential ancillary costs. Below is a detailed breakdown.
| Cost Category | Price Range |
|---|---|
| Parts (per mount) | $40 – $600 |
| Labor (per mount) | $135 – $1,200 |
| Ancillary Costs | $80 – $300 |
Parts Cost Breakdown
Mount type and source determine the price. Always match the replacement type to your driving needs.
- OEM Mounts: $80–$400 each. Best for modern vehicles with hydraulic or active systems. Ensures proper fit, damping, and longevity—especially on German and Japanese models.
- Aftermarket Standard: $40–$250 each. Suitable for basic rubber mounts on domestic vehicles. Avoid ultra-cheap units with poor rubber bonding or undersized housings.
- Performance Polyurethane: $100–$600 each. Reduces engine movement but increases cabin vibration. Ideal for towing or track use, not daily drivers.
Labor and Ancillary Costs
Labor varies drastically based on access. Always get a written estimate.
- Labor Hours: 1.5–6 hours per mount. Front mounts on FWD 4-cylinders: ~2 hours. Rear or subframe-mounted units on RWD V8s: up to 6 hours.
- Hourly Rate: $90–$200. Independents are cheaper; dealers and specialists charge more, especially for calibration work.
- Diagnostic Fee: $80–$150 (often waived if repair is done).
- Wheel Alignment: $80–$150. Recommended if subframe is moved.
- Related Repairs: Exhaust gaskets, vacuum lines, or transmission mounts may need replacement when exposed.
How to Diagnose a Failed Engine Mount
Don’t replace mounts based on vibration alone. Confirm the issue with these proven tests.
Visual Inspection
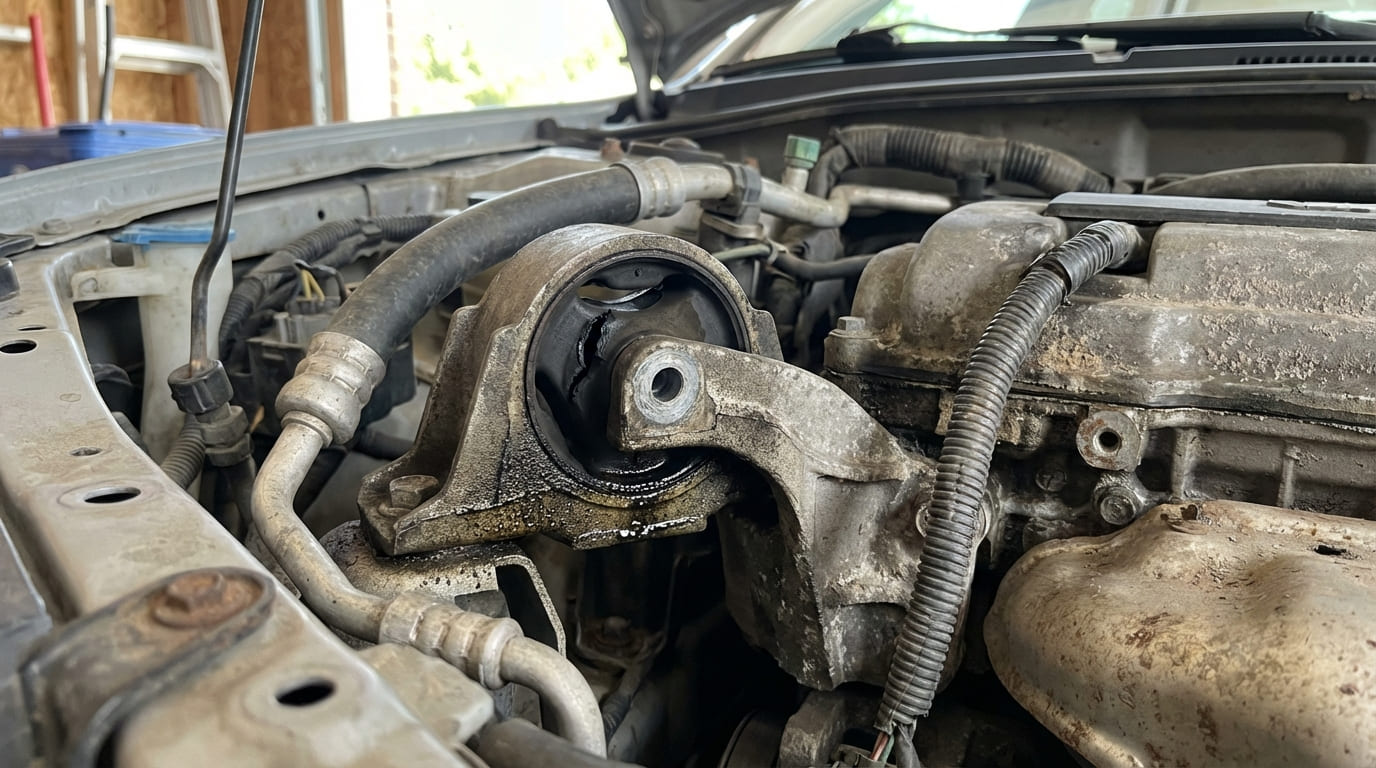
Use a flashlight and inspection mirror. Look for:
- Cracks, splits, or separation in rubber.
- Collapsed mount body or visible gap between rubber and metal.
- Dark, oily residue on hydraulic mounts (indicates fluid leak).
In my shop, we always compare mounts side-by-side. Some look bad but work; others look fine but are dead inside—especially hydraulic units.
Engine Rock Test (Load Test)
This simulates drivetrain forces and reveals excessive movement.
Tools: Floor jack, wood block, wheel chocks, helper.
Steps:
- Park on level ground, chock wheels, apply parking brake.
- Place wood block under oil pan or engine cradle (never on accessories).
- Slowly lift until engine rises ~1/2 inch.
- Observe each mount for separation, clunking, or movement.
- Repeat with transmission in gear and brake applied.
Failure Sign: More than 1/2 inch of movement or visible gap opening.
Drive Cycle Evaluation
Pay attention to these symptoms:
- Strong vibration at idle, especially in gear (worse in reverse on some V6s).
- Clunk when accelerating, decelerating, or shifting.
- Engine movement felt in steering wheel or floor.
Rule Out Other Causes
Many issues mimic mount failure. Check these first:
- Transmission mounts—they often fail before engine mounts.
- Driveshaft U-joints or CV axles for play.
- Exhaust hangers—broken ones can rattle like a clunking mount.
- Suspension bushings—worn control arm or strut mounts can amplify vibration.
On a 2008 Tacoma I worked on, the owner replaced the dogbone mount twice. The clunk was actually a broken exhaust hanger. Always isolate the noise source before disassembling.
Replacement Feasibility: DIY vs. Professional
Whether you can DIY depends on mount type and access.
DIY-Friendly: Basic Rubber Mounts
If you have clear access, this is doable for intermediate DIYers.
- Tools Needed: Jack stands, floor jack, sockets, torque wrench, pry bar.
- Safety: Support the engine from above using a 2×4 on a strut tower bar. Never rely solely on the jack.
- Torque Specs: 45–100+ lb-ft. Always use a torque wrench. Refer to your service manual.
In my shop, we always clean mount bolt threads with a tap. Corrosion causes false torque readings and leads to loose fasteners.
Pro-Only: Hydraulic, Active, or Hard-to-Reach Mounts
These require special tools and system knowledge.
- Tools Needed: Engine support bar, scan tool, vacuum pump, subframe alignment tools.
- Calibration Required: On BMW, Audi, and Acura models with active mounts, a factory scan tool is needed to initialize the system post-replacement.
- Safety: Use proper engine hoist points. Never lift on plastic oil pans or fragile brackets.
I once replaced an active mount on a BMW 335i—cleared the code, but the fault returned. Turns out a cracked vacuum hose under the intake manifold was the real culprit. Diagnose the control circuit before replacing the mount.
Factors That Affect Total Cost
Vehicle-Specific Considerations
- Engine Layout: Transverse (FWD) engines often allow better access. Longitudinal (RWD/AWD) setups have tighter rear clearances.
- Number of Mounts: Most cars have 3–5. Replacing all can quickly exceed $1,500 in parts alone on luxury models.
- Obstructions: Turbochargers, starters, or AC compressors may need removal. One Subaru job required pulling the turbo to reach the dogbone mount—added 2 labor hours.
Mount Technology
- Solid Rubber: Cheapest and easiest to replace. Failure is usually visible.
- Hydraulic: Better damping but can fail internally. Requires precise torque and sometimes bleeding.
- Active (Vacuum-Controlled): Adjusts stiffness. Requires diagnostics and recalibration. Never skip the scan tool step.
- Polyurethane: Durable but transmits more vibration. Not ideal for comfort-focused drivers.
Shop Type and Location
- Independent Shop: Lower rates, often ASE-certified. Great for standard replacements.
- Dealership: Higher rates but access to OEM tools, TSBs, and calibration software—worth it for active systems.
- Specialty Shop: Best for performance builds, but overkill for basic repairs.
What Happens If You Delay Replacement?
Ignoring a bad mount leads to bigger, costlier problems.
- Extra Stress on Components: Transmission mounts, CV axles, and exhaust hangers wear faster.
- Increased NVH: Constant vibration fatigues occupants and degrades cabin quality.
- Catastrophic Failure: Rare, but possible. I’ve seen failed mounts crack exhaust manifolds, tear wiring harnesses, or pinch fluid lines.
A 2014 Acura TLX came in with repeated mount failures. Turns out the subframe was misaligned from an unreported front-end collision. Always check for underlying structural issues—especially on unibody cars.
Lifespan and Preventative Maintenance
Most mounts last 60,000–100,000 miles or 5–10 years. Harsh driving, towing, fluid leaks, and extreme temperatures shorten life.
Prevention Tips:
- Inspect mounts during oil changes.
- Fix oil or coolant leaks promptly—fluids degrade rubber.
- Perform a rock test if vibration starts.
Recommended Practices and Common Mistakes
| Action | Recommendation |
|---|---|
| Bolt Reuse | Never reuse torque-to-yield (TTY) bolts unless specified. They stretch and lose clamping force. |
| Torque Wrench | Always use one. Mount bolts have precise specs—guessing leads to failure. |
| Part Quality | Use OEM or high-quality aftermarket on hydraulic/active systems. Cheap mounts fail fast. |
| Diagnosis | Never assume vibration = bad mount. Rule out transmission, exhaust, and driveline issues first. |
Common Failure Scenarios and Causes
| Symptom | Most Likely Causes | Less Common Causes |
|---|---|---|
| Excessive vibration at idle in gear | Failed hydraulic mount, worn transmission mount | Ignition misfire, idle air control fault |
| Clunk during acceleration or braking | Collapsed rubber mount, loose bolt | Driveshaft binding, suspension bushing failure |
| Fluid leak from mount | Internal hydraulic failure | Engine oil or coolant leak above |
| Engine visibly shifting | Complete mount separation, broken bracket | Subframe damage, prior collision |
Engine mount replacement isn’t just a parts swap—it’s a system-level repair. Accurate diagnosis, proper tools, and attention to detail ensure a lasting fix. Always consult the service manual for torque specs, TSBs, and calibration procedures. What works on one model may not apply to another, even within the same brand.