In my two decades in the shop, few engine issues carry the same sense of finality as a failed crankshaft bearing. Once you hear that knock—distinct, rhythmic, growing louder with load—it’s often too late. But the path to failure is rarely a single misstep. More often, it’s a chain of overlooked details, compounding stresses, and subtle clues missed along the way. This article cuts through the noise and gives you the diagnostics, repair logic, and real-world insights you need to catch bearing failure early—or avoid it entirely.
What Crankshaft Bearings Do and How They Fail
Crankshaft bearings support the rotating crankshaft while maintaining a thin, pressurized oil film between the metal surfaces. This hydrodynamic cushion prevents metal-to-metal contact under extreme loads. When that film breaks down or the bearing is compromised, failure follows. There are three main types:
- Main bearings – Support the crankshaft in the engine block.
- Connecting rod bearings – Connect the rods to the crankshaft throws.
- Thrust bearings – Control fore-aft movement of the crankshaft, usually integrated into one main bearing set.
Failure means metal-on-metal contact, leading to heat, wear, and eventually catastrophic engine damage. The key is catching it early—or better yet, preventing it.
Common Failure Modes and How to Diagnose Them
Every bearing failure has a cause. Recognizing the pattern helps pinpoint the fix. Here’s what to look for:
Fatigue, Wear, and Other Failure Types
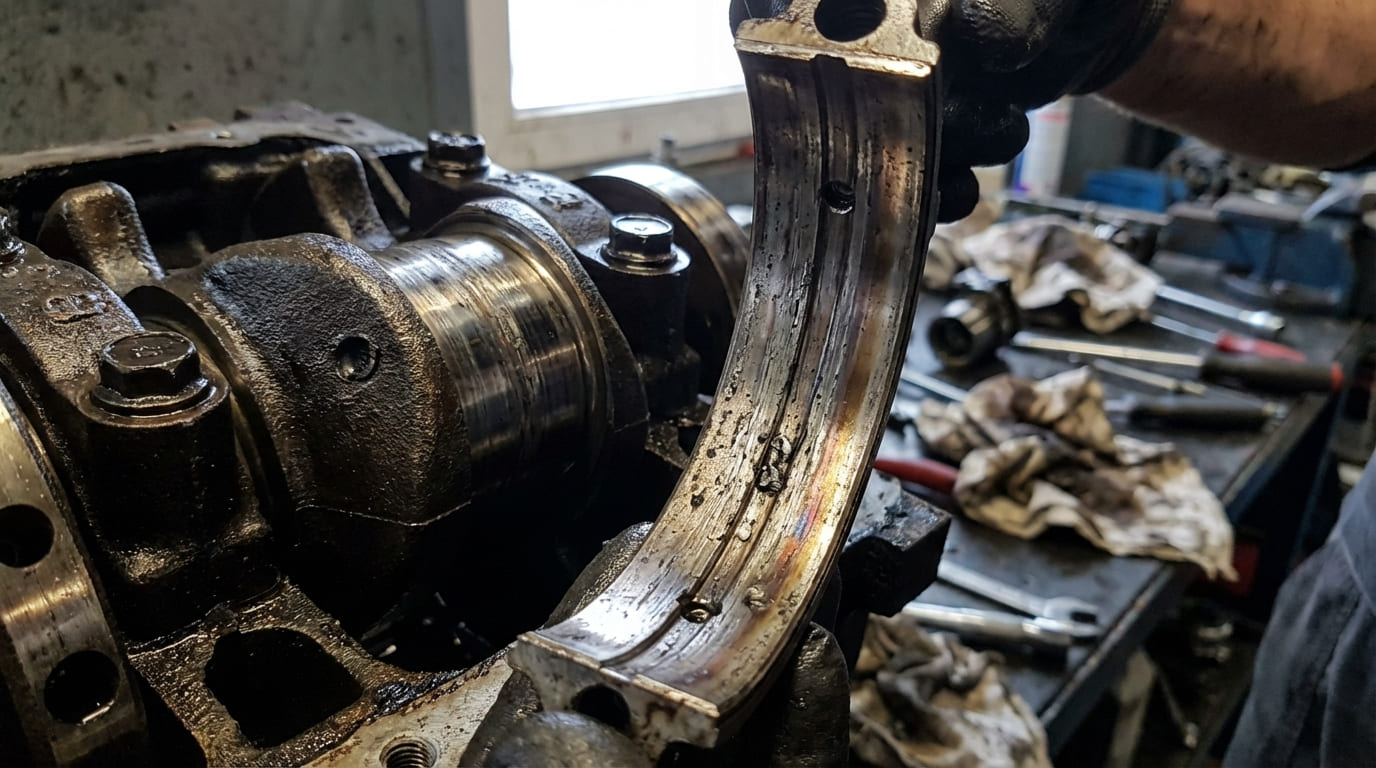
Fatigue, wear, cavitation, debris damage, and misalignment are the five main failure modes. Each leaves distinct evidence during teardown.
Fatigue Failure: Flaking or pitting on the bearing surface, usually in the center of the loaded half-shell. Caused by repeated stress cycles exceeding material limits.
- Common triggers: Detonation, high boost, overheating, or extended oil change intervals.
- How to check: Inspect bearing surface after removal. Flaking that looks like cracked paint points to fatigue.
Abrasive Wear: Scoring or grooves across the bearing surface. Caused by contaminants in the oil.
- How to check: Look for parallel scratches. Pull the oil filter and cut it open—metal shavings or sand-like grit confirm contamination.
- Master tip: Always inspect the oil pickup screen. A clogged screen means debris is circulating.
Adhesive Wear (Wiping): Bearing material smeared onto the crank journal. Oil film collapsed due to low pressure, high RPM, or poor break-in.
- How to check: Shine a light on the crank journal. If it’s coated with a coppery film, the bearing wiped.
- Repair vs replace: If the crank is damaged, it must be polished or replaced. Bearings alone won’t fix this.
Cavitation Erosion: Sponge-like pitting on the non-loaded side of the bearing. Caused by high-frequency vibration or poor oil damping.
- How to check: Look for clustered pits not aligned with load zones. Check the torsional damper and balance shafts.
- Master tip: In my shop, we replace the damper any time we see cavitation, even if it looks intact.
Foreign Object Damage: Dents, gouges, or embedded debris in the bearing surface.
- How to check: Inspect the oil pan and pickup screen. RTV chunks, gasket pieces, or metal shavings are red flags.
- Master tip: Clean every threaded hole in the block with a bottoming tap before reassembly. Debris hides in blind holes.
Misalignment and Edge Loading: Wear concentrated at the edges of the bearing, especially one side.
- Causes: Bent connecting rod, warped crankshaft, distorted block, or incorrect main cap torque.
- How to check: Measure rod alignment with a comparator. Check block main bore alignment with a precision straight edge.
Symptoms and Diagnostic Steps
You don’t need to tear the engine apart to suspect bearing trouble. Start here:
The classic sign is a deep, metallic knock from the lower end. It gets louder under load and persists when the engine is warm. Unlike piston slap, it doesn’t fade.
Other key indicators:
- Flickering oil pressure light at idle (especially when hot).
- Metallic glitter on the dipstick or in the oil pan—non-magnetic flakes (copper, lead) point to bearing material.
- Burnt oil smell from excessive friction heat.
In my shop, we never ignore a flickering oil light. I’ve seen engines survive 10,000 miles with a knock—but once oil pressure drops, you’re on borrowed time.
Diagnostic Table: What to Do Next
| Symptom | Most Likely Cause(s) | Less Common But Possible | Recommended Next Step |
|---|---|---|---|
| Low oil pressure at idle (hot) | Excessive bearing clearance, worn oil pump | Clogged pickup, wrong oil viscosity | Verify with mechanical gauge; inspect pan and filter |
| Knock under load, RPM-dependent | Worn rod or main bearing | Failing balance shaft, loose flywheel | Stethoscope check; oil analysis |
| Metallic debris in oil | Bearing wear, piston skirt damage | Cam lobe spalling, timing chain debris | Filter inspection; spectrometric analysis |
| Excessive crank end play | Thrust bearing wear or failure | Improper cap torque, block distortion | Measure with dial indicator; check cap alignment |
Repair vs Replace: Cost and Viability
Fixing bearing failure is never cheap. Here’s what to expect:
| Repair Type | Typical Cost Range | When It’s Viable |
|---|---|---|
| Full engine rebuild | $2,500–$6,000+ | Engine has low miles, no other damage, sentimental or performance value |
| Short block replacement | $1,800–$4,000 | Time-sensitive repair; OEM or remanufactured block available |
| Used engine swap | $1,000–$2,500 (plus labor) | Budget option; verify mileage and history |
| Walk away | $0 | High-mileage vehicle; repair cost exceeds value |
In my shop, we only rebuild engines when the customer plans to keep the car long-term. Otherwise, a quality remanufactured short block saves time and hassle.
Best Practices for Prevention and Rebuilds
Most bearing failures are preventable. These steps have saved countless engines:
- ✅ Clean all block and cap threads with a bottoming tap before assembly. Even minor debris affects torque accuracy.
- ✅ Verify bearing clearance with plastigage or a micrometer/bore gauge. Never assume the color code is correct—mismatched sets cause tight spots.
- ✅ Prime the oil system before startup on any rebuild. Dry starts are a leading cause of early bearing failure.
- ⚠️ Never reuse torque-to-yield (TTY) bolts unless the manual explicitly allows it. They stretch and won’t achieve proper clamp load.
- ⚠️ Use RTV sealant sparingly near the oil pan or main caps. Excess can break loose and clog the pickup.
- ⚠️ Never ignore a flickering oil pressure light. It’s often the only warning you’ll get.
Real-World Lessons from the Shop
Situation: 2012 F-150, 98,000 miles, steady knock, low oil pressure. Owner used conventional oil every 10,000 miles.
Assumption: Worn rod bearings from poor maintenance.
Discovery: Abrasive wear present—but filter was clean. Pickup screen blocked with sand-like particles. Non-OEM filter had degraded media.
Lesson: Filtration quality matters as much as change intervals. Always inspect the filter and screen.
Situation: Rebuilt 5.3L LM7 knocked at 2,000 miles. Builder claimed proper assembly.
Assumption: Bad bearings or incorrect clearance.
Discovery: Edge loading on rod bearings. Rods were bent from a prior spin—rebuilder skipped alignment check.
Lesson: Rebuilt engines are only as good as the inspection. Always check rod alignment and crank straightness.
Situation: Turbo VW TDI knocked after timing belt job. Oil pressure normal.
Assumption: Rod knock from overboost.
Discovery: Metal fragment in main bearing—piece of valve guide that broke off during timing job.
Lesson: Correlation isn’t causation. Always trace debris to its source.
Long-Term Maintenance That Works
Engines with consistent oil changes using the right fluid last. For daily drivers, follow the manufacturer’s interval. For high-stress use—towing, track, modifications—halve the interval and use a high-quality synthetic with proven shear stability.
During rebuilds:
- Measure every clearance. Typical main/rod bearing clearance: 0.0015″ to 0.0025″ on cast iron blocks. Consult the manual.
- Check main bearing bore warpage: Acceptable range is usually 0.002″ to 0.004″. Use a precision straight edge and feeler gauge.
- Always flush the oil system and replace the pickup screen when replacing bearings.
The oil system is a closed loop. Debris from one failing part can kill another. When you find bearing material, you don’t just replace bearings—you find the source.