In my two decades as a master mechanic, I’ve replaced valve stem seals without removing the cylinder head on dozens of engine types. The answer is yes — it’s possible on many modern overhead cam engines — but only if access, tooling, and component condition allow it. This job isn’t for every engine or every DIYer. I’ve seen well-intentioned attempts lead to dropped valves, broken retainers, and costly comebacks. Success hinges on preparation, the right tools, and knowing when to walk away and pull the head.
How to Determine If On-Head Replacement Is Possible
Before removing a single bolt, assess whether your engine is a viable candidate. This isn’t just about whether you can see the springs — it’s about tool clearance, cylinder sealing, and guide condition. Skip this step, and you risk a half-disassembled engine and a tow bill.
Key Diagnostics to Perform First
Blue exhaust smoke at startup or during deceleration is the classic symptom of leaking valve stem seals, but it’s not definitive. Other issues — worn piston rings, failed turbo seals, or a clogged PCV system — can mimic the same behavior. Confirm the source before opening the valve cover.
Start with a compression test. Healthy cylinders should read within 10% of each other and above the factory minimum (typically 130–160 psi). Low or uneven compression suggests deeper valve or ring problems that require head removal.
Next, perform a leak-down test. This is far more revealing:
- If air escapes through the oil cap, the issue is likely worn rings or a damaged cylinder wall.
- Leakage through the intake points to a faulty intake valve or seat.
- Exhaust-side leaks indicate exhaust valve issues.
- Less than 10% leakage is acceptable; above 15% warrants further investigation.
Finally, use a borescope to inspect the valve stems and guides. Look for vertical scoring, pitting, or excessive wobble. If the valve stem moves laterally more than 0.003″–0.005″, the guide is worn — and no new seal will fix that. On aluminum heads, guide clearance specs are tighter (often 0.001″–0.002″).
In my shop, we always run a leak-down test before touching the valve cover. I once saved a customer $1,200 by diagnosing a clogged PCV system that was pulling oil into the intake — not bad stem seals.
Engine Access and Tooling Requirements
Even with perfect diagnostics, physical access determines feasibility. The three critical factors are:
- Spark plug bore depth: The cylinder must be safely pressurized to hold the valve in place. This requires threading an air adapter (usually M14x1.25 or M10x1.0) into the spark plug hole. If the bore is too shallow or damaged, the adapter won’t seal — and you can’t pressurize the cylinder.
- Valve spring clearance: You need at least 1.5 inches of vertical space above the spring to fit an on-head compressor. Engines with coil-on-plug (COP) ignition often provide good access once coils are removed, but some compact four-cylinders (like certain Ford Ecoboost and GM turbo engines) have such tight packaging that tools simply won’t fit.
- Retainer design: Some retainers sit too low for compressor arms to engage. I’ve abandoned jobs on Honda K-series engines because the tool couldn’t get enough grip.
If any of these factors are compromised, head removal becomes the faster, safer choice.
Essential Tools and Cost Overview
This is not a job for basic hand tools. Here’s what you’ll need — and what it costs:
| Tool | Cost Range | Notes |
|---|---|---|
| Cylinder air adapter (M14 or M10) | $15–$30 | Match thread pitch to your spark plug; clean threads with a chaser before installing |
| On-head valve spring compressor | $60–$120 | Must fit your engine’s valve cover rail or rocker studs; universal kits are hit-or-miss |
| Valve stem seal pliers and installer set | $25–$50 | Use seal-specific tools — wrong size can damage the lip |
| Magnetic pickup tool (flexible) | $10–$20 | Essential for retrieving dropped keepers |
| Borescope (4mm, articulating) | $80–$150 | Highly recommended for pre- and post-inspection |
| Regulated air supply (90–120 psi) | — | Use a regulator with gauge; never use unregulated shop air |
I keep a dedicated kit for on-head seal jobs. Spending $200 once beats buying cheap tools that fail mid-job. For occasional use, rent the compressor and air adapter from an auto parts store — many offer loaner programs.
Step-by-Step Replacement Procedure
If diagnostics and access check out, follow this proven sequence. One misstep can result in a dropped valve — which may bend the stem or crack the piston.
Preparation and Safety
Disconnect the negative battery terminal. Remove the valve cover, spark plugs, and ignition coils. Label and bag all hardware. Clean the area around each valve spring thoroughly — dirt falling into the cylinder causes catastrophic damage.
Rotate the engine until the piston for the cylinder you’re working on is at Top Dead Center (TDC) on the compression stroke. This minimizes the distance the valve can drop if air pressure fails.
Pressurize the Cylinder
Thread the air adapter into the spark plug hole by hand first. Cross-threading ruins the plug bore and kills the repair. Once snug, connect regulated air (100 psi is ideal). A hiss from the intake or exhaust may indicate a leaking valve — tap the valve stem lightly with a plastic mallet to seat it. If pressure holds, proceed.
In my shop, we always crack the throttle body open slightly during pressurization. It helps equalize pressure and prevents false leak indications.
Compress the Spring and Remove Keepers
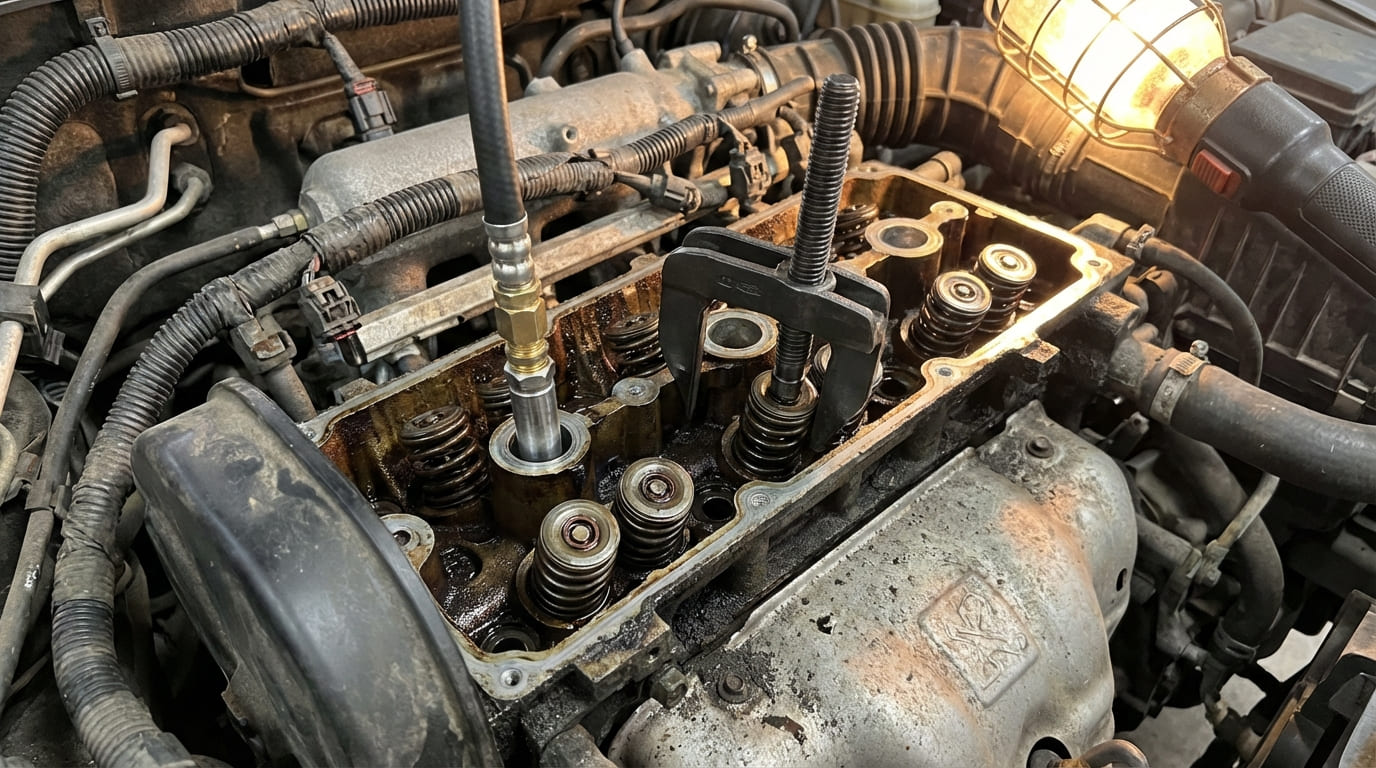
Position the on-head compressor over the valve spring. Engage it securely. Slowly compress the spring until the keepers are exposed. Use a magnetic pickup tool to remove the keepers — they’re small and spring-loaded. If they resist, tap the valve stem gently to free them. Never force it.
Replace the Seal
Use seal-specific pliers to remove the old seal. Inspect the valve stem and guide for scoring or play. If the stem shows vertical grooves or lateral movement exceeds 0.004″, the guide is worn — head removal is now necessary.
Lubricate the new seal with clean 5W-30 oil. Use the correct installer tool — it should slide on smoothly. Forcing it means the tool is wrong or there’s a burr on the guide. Recheck sizing and clean the guide with a deburring tool if needed.
Reassemble and Release Pressure
Apply a light coat of grease to the new keepers to hold them in place. Compress the spring again and guide the keepers back into the retainer groove. Tap the valve stem gently to ensure they’re fully seated. Verify position with a borescope if possible.
Slowly release air pressure by cracking the hose fitting — don’t yank it off. Sudden decompression can cause the valve to snap down and damage components.
Repeat for each affected cylinder. I recommend replacing all seals if one is bad — they wear at similar rates.
Post-Repair Verification
Reinstall the valve cover using a new gasket. Torque bolts in sequence to spec — over-tightening warps covers and causes oil leaks. Refill oil to the correct level; overfilling can mask as consumption.
On startup, expect some smoke — oil pooled in the ports will burn off. But if blue smoke persists after 5–10 minutes or returns during deceleration, the repair didn’t fix the root cause.
Drive the vehicle for 100–200 miles under real-world conditions, especially engine braking. Check oil level at 50 and 100 miles. No consumption? You succeeded. Still burning oil? Re-evaluate guide wear or installation errors.
When to Pull the Head Instead
Not every engine is suitable for on-head work. Here’s when to skip it and remove the head:
- Insufficient tool clearance (common on turbocharged four-cylinders)
- Damaged spark plug threads that won’t seal
- Excessive valve guide wear (>0.004″)
- Need for valve service, resurfacing, or spring replacement
And forget quick fixes like high-mileage oils with seal conditioners. I’ve tested them — they might soften a slightly hardened seal for a few thousand miles, but they won’t stop oil consumption from a torn or cracked seal.
| Symptom or Condition | Most Likely Cause(s) | Feasibility of On-Head Repair | Notes |
|---|---|---|---|
| Blue smoke at startup only | Hardened or cracked valve stem seals | High | Typical wear pattern; good candidate for in-head replacement |
| Blue smoke during deceleration | Failed stem seals or excessive guide clearance | Moderate | Check guide play — may require head removal if >0.004″ |
| Blue smoke at idle and under load | Piston rings, PCV issue, or turbo seals | Low | Stem seals less likely; rule out other sources first |
| Valve train noise after repair | Improper keeper seating or lost clearance | N/A | Verify valve lash; inspect for bent stems or damaged retainers |
| Smoke persists post-repair | Guide wear, incorrect seal type, or installation error | Re-evaluate | Borescope inspection recommended before disassembly |
Situation: A 2012 Toyota Camry 2.5L came in with heavy startup smoke. Compression and leak-down tests were within spec. I assumed worn stem seals.
Discovery: During borescope inspection, I noticed the exhaust valve stems had visible vertical scoring. After removing the springs, I found the seals were intact but the guides had over 0.006″ play.
Nuanced Lesson Learned: Smoke isn’t always the seal — sometimes it’s the guide. Replacing the seal alone would’ve been a waste of time. Head removal was necessary for guide replacement.
Situation: A 5.7L Hemi showed startup smoke. Customer had already replaced coils and plugs. I set up for on-head seal replacement.
Discovery: The air adapter wouldn’t seat properly — the spark plug bore was damaged from over-torqued plugs. I couldn’t achieve reliable cylinder pressure.
Nuanced Lesson Learned: Even if the engine design allows it, component condition can block access. In this case, heli-coil repair was needed before proceeding — ultimately making head removal a better option.
Situation: A 2008 Subaru Forester with 180k miles had smoke on startup. I replaced all intake and exhaust stem seals in-head.
Discovery: Smoke returned after 3,000 miles. Leak-down showed 18% loss on two cylinders. Upon disassembly, the new seals had rolled during installation due to a mis-sized driver.
Nuanced Lesson Learned: Tool precision matters. Using the wrong installer can ruin a good seal. Always verify tool compatibility with the seal manufacturer’s specs.
Critical Best Practices
- ✅ Do: Clean spark plug threads with a thread chaser before installing the air adapter. Prevents leaks and cross-threading.
- ✅ Do: Label and bag keepers by cylinder. Some vary slightly in size; mixing them can cause improper seating.
- ✅ Do: Use a borescope to verify keeper position after installation. A single dislodged keeper can lead to valve drop on startup.
- ⚠️ Don’t: Reuse old valve stem seals. Heat cycling degrades their sealing ability — always replace them.
- ⚠️ Don’t: Skip the leak-down test. It’s the best way to isolate whether the issue is valves, rings, or something else.
- ⚠️ Don’t: Force the seal installer. If it doesn’t slide on smoothly, check for burrs or incorrect tool size.
On-head valve stem seal replacement can save you hours of labor and hundreds in shop bills — but only when done correctly on a suitable engine. The decision to proceed should be based on solid diagnostics, proper tooling, and honest assessment of access. When in doubt, consult the factory service manual for torque specs, clearances, and special procedures. Because no two engines are exactly alike — and one wrong move can cost you a head gasket.