In my experience working on turbocharged gasoline and diesel engines over the last two decades, finding oil inside the intercooler tends to raise alarms—sometimes unnecessarily, sometimes justifiably. While a trace amount is normal, excessive accumulation points to underlying issues that, if left unchecked, can degrade performance or lead to more serious damage. This article walks through a methodical diagnostic path I use in my shop, balancing real-world observations with sound technical principles.
Confirming Oil in the Intercooler
Before diagnosing a problem, confirm you’re actually dealing with oil and not another fluid. Misdiagnosis leads to wasted time and money.
Visual and Physical Inspection
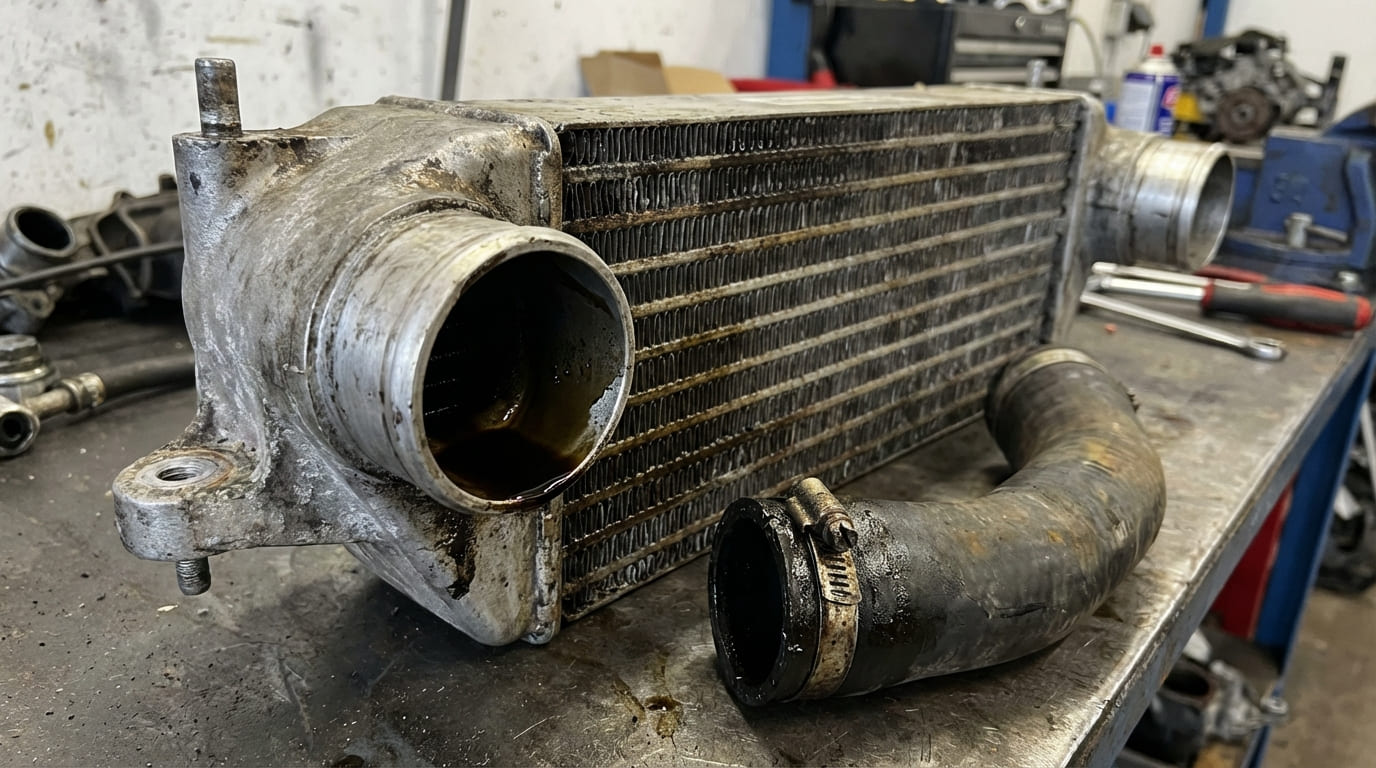
Remove the intercooler inlet and outlet hoses to access the internal passages. Shine a flashlight inside and look for residue. A light sheen is common, especially on high-mileage vehicles. Pooled oil, dripping, or thick black sludge is not normal and requires immediate investigation.
Fluid Identification
What you’re seeing might not be engine oil. Use these traits to identify the fluid:
- Engine oil: Brown to black, viscous, greasy feel, petroleum smell.
- Coolant: Green, orange, or pink; watery texture, sweet odor. Suggests intercooler core leak or cooling system issue.
- Fuel: Clear to light yellow, evaporates quickly, strong gasoline or diesel smell. Rare, but possible with fuel system malfunctions.
In my shop, we always wipe a sample onto a clean rag and let it sit. Oil leaves a permanent stain; coolant evaporates and leaves residue; fuel vanishes completely within minutes.
Normal vs. Excessive Oil Accumulation
A light film of oil is expected in most turbocharged engines. The PCV system routes crankcase vapors—including minute oil mist—into the intake. Think of it like condensation in an air compressor: some is inevitable.
Excessive oil—puddling, dripping, or coating the entire internal surface—indicates a system failure. This level of accumulation reduces performance and risks engine damage.
Primary Causes and How to Diagnose Them
PCV System Failure
The PCV system manages crankcase pressure and recirculates vapors. When it fails, excess oil is pushed into the intake and intercooler.
How to Check: PCV Valve Function Test
- Remove the oil filler cap and place your hand over the opening while the engine idles.
- Feel for vacuum: slight suction is normal. Strong suction may mean the valve is stuck open; positive pressure (blowing air) suggests it’s stuck closed or there’s excessive blow-by.
- Remove the PCV valve and shake it. If it doesn’t rattle, it’s likely seized.
How to Check: Hose and Line Inspection
- Disconnect PCV hoses and inspect for internal sludge or collapse.
- Use low-pressure air or a vacuum pump to test flow. No flow = replace.
Repair and Cost
PCV valve replacement: $20–$75 for the part, DIY-friendly. Use OEM or high-quality aftermarket—cheap valves often fail quickly. Replace hoses with oil-resistant silicone ($15–$40 for a kit). Clean PCV ports in the intake with brake cleaner during replacement.
Failed Oil Separator or Catch Can
Modern engines use oil separators (often in the valve cover) to remove oil from crankcase vapors. If clogged or cracked, oil enters the intake unchecked.
How to Check
- Inspect separator housing for cracks or sludge.
- Check drain passages for blockages.
- On diaphragm-type units, listen for whistling or check for pressure at the oil cap—indicative of rupture.
Repair and Cost
Replacement cost: $150–$500 depending on engine. Some require valve cover removal (2–4 hours labor). After replacement, verify slight vacuum at the oil cap at idle. Consider adding a quality catch can on performance engines—$100–$200, DIY-installable.
In my shop, we always bench-test used oil separators. A functional unit should restrict airflow in one direction and allow flow in the other. If it flows freely both ways, it’s done.
Turbocharger Seal Failure
The turbo’s compressor-side seal prevents oil from the center housing from entering the intake. When it fails, oil floods the intercooler.
How to Check: Turbo Shaft Play Test
- Disconnect the intake pipe from the turbo inlet.
- Use a dial indicator to measure radial and axial movement of the compressor wheel.
- Radial play > 0.006 in or axial > 0.003 in usually indicates wear. Always consult factory specs—some turbos allow more play.
How to Check: Boost and Smoke Test
Low or inconsistent boost under load supports the diagnosis. A smoke test on the intake can reveal oil mist being pushed from the turbo, but this is supplemental—not definitive.
Repair and Cost
Turbo replacement: $800–$2,500 (OEM remanufactured). Rebuilds: $400–$900 but require precision balancing—best left to specialists. Always inspect oil feed and drain lines before replacement. A kinked or clogged drain line is a common cause of repeat failure.
I’ve seen too many DIYers replace a turbo only to have it fail in 3 months. The real culprit? A sagging oil drain line that traps oil and pressures the seal. Always verify a straight, downhill path to the oil pan.
Excessive Crankcase Pressure (Blow-by)
Worn piston rings or cylinder walls allow combustion gases into the crankcase, overwhelming the PCV system and forcing oil into the intake.
How to Check: Compression Test
- Remove all spark plugs, disable fuel.
- Thread in a compression tester and crank the engine.
- Compare readings to spec. More than 10–15% variation between cylinders or low overall readings indicates wear.
How to Check: Leak-Down Test
- Apply compressed air to each cylinder at TDC (compression stroke).
- Listen for air escaping: out the intake (valves), exhaust (valves), or oil filler (rings).
- Air blowing past the rings confirms the issue.
Repair and Cost
Engine rebuild: $2,500–$6,000. Replacement: $4,000–$8,000. Stop-leak additives and catch cans only mask the symptom. If oil consumption exceeds 1 quart per 1,000 miles and blow-by is confirmed, internal engine work is unavoidable.
A customer once brought in a high-mileage diesel with oil in the intercooler. Leak-down test showed 25% leakage—all out the oil cap. Rings were shot. He’d already replaced the turbo twice. Root cause matters.
Overfilled Engine Oil
Simple but often overlooked. Too much oil increases splashing and aeration, which the PCV system pulls into the intake.
How to Check: Dipstick Level
- Check oil level with engine off and at operating temperature (or after 10-minute cool-down).
- Level above “MAX” confirms overfill.
Repair and Cost
Drain excess oil until level is in the normal range. Cost: $0 if DIY. Recheck after driving. This fix takes 10 minutes and solves the problem in 1 out of 10 cases I see.
Aftermarket Modifications
Performance upgrades can disrupt the factory ventilation system. Removing oil separators, incorrect catch can plumbing, or removing turbo oil restrictors can cause oil accumulation.
How to Check: System Review
- Compare current setup to OEM routing.
- Check for missing oil separators, undersized drain lines, or removed oil restrictors.
Repair and Cost
Revert to OEM or correct the setup. A proper catch can system: $100–$300. Ensure it’s installed before the turbo and has a functional drain path. Recirculating to the intake is safer than venting to atmosphere on street-driven vehicles.
One modified Subaru owner removed the factory separator to “reduce restriction.” Result? Oil-coated intercooler and fouled MAF sensor. He didn’t gain power—he lost drivability. Factory systems are engineered for a reason.
Consequences of Ignoring Oil in the Intercooler
Left unaddressed, oil accumulation leads to:
- Reduced intercooler efficiency: Oil insulates fins, increasing intake temps and reducing power.
- Intake valve carbon buildup: Especially in direct-injection engines, oil isn’t washed away by fuel, leading to deposits.
- Sensor contamination: MAF and MAP sensors fail when coated with oil, causing poor fueling and drivability issues.
- Runaway diesel engine: Oil in the intake can act as fuel. I’ve seen two cases where a turbo seal leak caused uncontrolled engine overspeed—shut down only by blocking the intake.
- Increased oil consumption: Oil in the intercooler is oil not lubricating the engine. Low oil levels lead to bearing damage.
Diagnostic Decision Guide
| Observed Symptom | Most Likely Cause(s) | Diagnostic Next Step | Repair Complexity |
|---|---|---|---|
| Light oil film, no performance issues | Normal PCV operation | Monitor over 1000 miles | None |
| Oil puddling, no smoke or power loss | Clogged PCV, failed separator | PCV function test, inspect hoses | DIY |
| Heavy oil, blueish smoke at idle | Turbocharger seal failure | Shaft play test, boost check | Pro |
| Oil + high crankcase pressure | Excessive blow-by (rings/cylinders) | Compression and leak-down test | Pro |
| Oil after recent oil change | Overfilled crankcase | Check dipstick level | DIY |
Best Practices: What to Do and What to Avoid
- ✅ Clean PCV system hoses and ports during replacement. Sludge hides in elbows—flush with brake cleaner and compressed air.
- ✅ Use OEM or equivalent PCV valves. Aftermarket units often don’t meter correctly, disrupting system balance.
- ✅ Inspect turbo oil drain line for kinks or blockages. A clogged drain line causes oil pooling and seal failure.
- ⚠️ Avoid replacing the turbo without checking oil lines. A restricted drain line often causes premature failure—replace without fixing it, and the new turbo will fail too.
- ⚠️ Avoid assuming oil means a bad turbo. I’ve torn down turbos with perfect shaft play—root cause was a clogged catch can.
- ⚠️ Avoid ignoring PCV function on modified engines. More boost increases crankcase pressure—many aftermarket setups don’t upgrade ventilation.
Situation: A 2015 VW Golf TDI came in with oil dripping from the intercooler outlet. Owner assumed the turbo was shot.
Initial Assumption: Compressor seal failure—common on high-mileage TDI engines.
Deep Dive: I checked turbo shaft play—within spec. Boost pressure was stable. Then I pulled the oil filler cap—strong positive pressure at idle. Leak-down test showed 18% leakage, all coming from the oil cap.
The Nuanced Lesson Learned: The issue wasn’t the turbo; it was worn piston rings overwhelming a marginal PCV system. Replacing the turbo would’ve been expensive and ineffective. Root cause matters more than symptoms.
Situation: A modified Subaru WRX had heavy oil in the intercooler after a turbo upgrade. Owner had removed the factory oil separator to “reduce restriction.”
Initial Assumption: Aftermarket turbo seal failure.
Deep Dive: Shaft play was minimal. But the new setup routed PCV directly into the intake without any oil separation. Bench testing a used OEM separator showed it captured over 80% of oil mist.
The Nuanced Lesson Learned: Removing factory emissions components for “performance” can backfire. The engine didn’t make more power—it just fouled sensors and filled the intercooler with oil.
Situation: A diesel pickup had oil in the intercooler and slight power loss. Technician replaced the turbo twice in six months.
Initial Assumption: Defective remanufactured turbos.
Deep Dive: I inspected the oil drain line—kinked under the exhaust manifold. Oil couldn’t return to the pan, building pressure in the turbo housing.
The Nuanced Lesson Learned: Even a perfect turbo can’t survive poor oil drainage. Always verify feed and drain line condition before replacement.
Oil in the intercooler isn’t a diagnosis—it’s a clue. The real work begins when you start asking not just “what’s leaking,” but “why is pressure or flow going where it shouldn’t?” I’ve learned to respect the complexity of crankcase ventilation systems; they’re more critical than many realize. When in doubt, consult the factory service manual for the specific engine’s tolerances and testing procedures—what’s normal for one powerplant might be a red flag on another.