In my two decades turning wrenches in shops from rural garages to high-performance engine builds, few events trigger as much dread as the telltale bang of a dropped valve. It’s not just a failure — it’s a cascade. And while the root cause might seem straightforward, the aftermath is rarely simple. This isn’t a “replace the gasket and you’re good” scenario. What follows is a breakdown of what actually happens, how to diagnose it properly, and what your options are — not just in theory, but in the real world where budgets, time, and parts availability matter.
Immediate Mechanical Consequences
When a valve separates from the valve train and falls into the combustion chamber, it usually occurs as the piston nears top dead center (TDC) on the compression or exhaust stroke. On interference engines — which most modern engines are — there’s minimal clearance between the open valve and piston. A dropped valve eliminates that margin entirely.
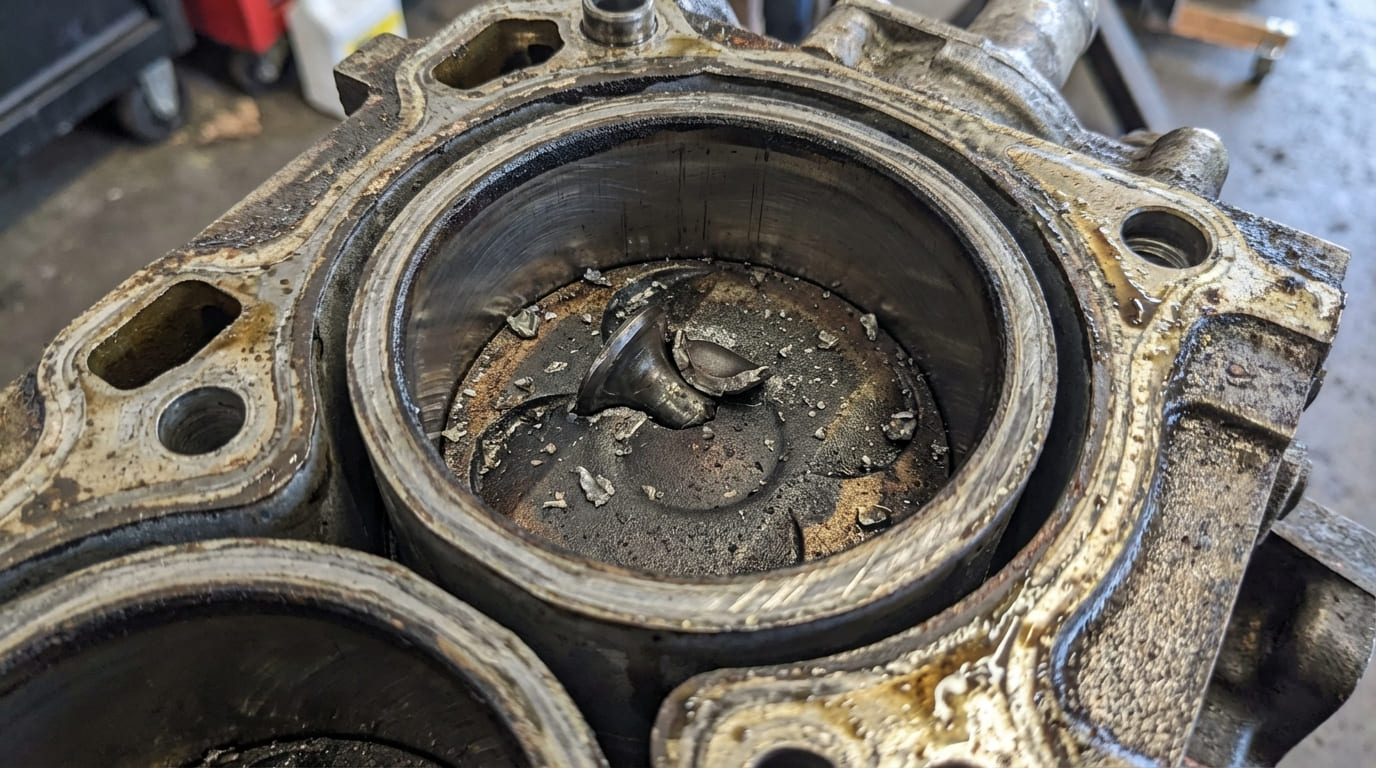
The valve head becomes a high-velocity projectile. The piston strikes it with full force, concentrating thousands of pounds of pressure on a small area of the crown. This impact causes immediate, severe deformation: craters, cracks, or even a hole through the piston. The valve head often shatters, scattering metal fragments into the cylinder.
Energy from the impact travels through the piston, into the connecting rod, and reaches the crankshaft. Even if the rod appears straight, it can stretch microscopically or damage the wrist pin. Rod bearings frequently fail from shock loading — I’ve seen wiped bearings with no other visible damage. In many cases, the engine seizes instantly, either from mechanical binding (valve fragment lodged in the cylinder) or catastrophic bearing failure.
How to Diagnose a Dropped Valve
The first clue is often a single, sharp metallic “BANG” — not a knock or ping, but a definitive impact. The engine usually stalls immediately. If it runs briefly, expect violent shaking, misfires, and grinding noises as broken parts move with each revolution. On OBD-II vehicles, misfire codes (P030X) appear, but they’re not specific. The real diagnostic work begins with physical inspection.
Step-by-Step Diagnosis
Start with the simplest checks before teardown:
- Inspect the spark plug hole: Remove the plug and shine a flashlight into the cylinder. Look for debris, impact marks, or a valve head resting on the piston.
- Check the oil: Drain the oil and inspect the drain plug. A magnetic plug covered in metal shavings is a red flag. Cut open the oil filter and inspect for metal fragments.
- Perform a compression test: A dropped valve will show zero or very low compression on the affected cylinder. However, this doesn’t confirm the cause — just the symptom.
- Use a borescope: Insert a flexible borescope through the spark plug hole. Rotate the crank slowly and inspect the piston crown, cylinder walls, and combustion chamber. Look for the valve head, cracks, or loose debris. This step can confirm the need for head removal without unnecessary disassembly.
- Remove the cylinder head (if needed): Once confirmed, remove the head per OEM specs. Inspect the combustion chamber, valve pockets, and piston directly. Check all valve train components — keepers, springs, retainers — for signs of fatigue or improper installation.
In my shop, we always run a borescope before pulling the head. It saves hours of labor and confirms whether the damage is isolated or widespread. If you see a valve head sitting on the piston, you already know the engine must come apart — but at least you’re not guessing.
What Gets Damaged — And How Badly
A dropped valve rarely damages just one part. The failure cascades through multiple systems. Here’s what to expect:
Piston and Cylinder Damage
The piston crown is almost always damaged — from a deep crater to a fully breached hole. Shock can also collapse ring lands, leading to compression loss and oil consumption. If the connecting rod bends, the piston cocks in the bore, scoring the skirt and cylinder wall.
Cylinder bore scoring is common if the engine rotated after impact. Deep grooves may exceed allowable overbore limits. In extreme cases — especially in aluminum blocks — the impact can crack the cylinder wall between bores, making the block unrepairable.
Valvetrain and Cylinder Head Damage
The valve doesn’t drop cleanly. It often takes the seat or guide with it. On aluminum heads, seat inserts can crack or pop out. Valve guides may be distorted, especially if the stem broke at the guide. Combustion chamber walls can have impact craters up to 1/4 inch deep.
Even components upstream suffer. If the valve stem shears, the retainer or keeper can jam the rocker arm or pushrod, bending rockers or cracking roller lifters. Always inspect the entire valvetrain — not just the affected cylinder.
Connecting Rod, Crankshaft, and Bearings
Bent connecting rods are common. I measure all rods with a rod vise and alignment tool — some look straight but show angular deviation under load. Rod and main bearings often show brinelling, wiping, or flaking from shock loading.
Even if the crankshaft looks fine, check journal runout. I’ve seen cranks flex slightly at the web, causing vibration down the road. Always mic the journals and inspect for micro-cracks.
Secondary System Damage
Debris circulates through the oil system, potentially plugging feeds to lifters, turbos, or cam bearings. On turbocharged engines, a dropped intake valve can send fragments into the turbo inlet, shattering the compressor wheel. Even if the turbo spins freely, internal damage may not show until weeks later.
Never assume a turbo failure caused the event — it may be a symptom. If you find metal in the oil or a damaged turbo, inspect the combustion chamber first. Debris from a dropped valve can destroy a perfectly good turbo in seconds.
Repair vs. Replace: The Real-World Decision
Before investing in a rebuild, assess the block’s integrity. If the cylinder bore is deeply scored (>0.003”), overboring may be needed — but only if the wall thickness allows it. A cracked block or severely warped deck surface usually means replacement.
Check main bearing bore alignment with a precision straightedge and feeler gauge. A bent rod can distort main caps, making the block unsuitable for rebuild.
Cylinder Head: Repair or Replace?
Aluminum heads with cracked seats or guides can sometimes be repaired with inserts — but only if the surrounding casting is sound. I’ve seen shops attempt repairs on badly cracked heads; they leak compression or coolant shortly after.
For high-mileage or performance engines, I often recommend a remanufactured head with upgraded components. It’s faster and sometimes cheaper than rebuilding the original.
Cost Comparison: Rebuild vs. Replacement Engine
A full rebuild — including machining, new pistons, rings, rods, bearings, head work, and assembly — typically costs $3,000 or more in labor and parts. A quality remanufactured long block runs $2,500–$4,000 delivered.
In my shop, if the block is damaged beyond honing or the crank needs replacement, I lean toward a replacement engine. Time is money, and downtime matters to the customer.
| Scenario | Most Likely Cause | Less Common But Possible Causes | Diagnostic Priority |
|---|---|---|---|
| Sudden bang, engine seized | Valve drop with mechanical lock | Connecting rod failure, hydrolock | Borescope, compression test |
| Metal in oil, no start | Internal fracture (valve, piston) | Timing chain failure, spun bearing | Oil analysis, plug inspection |
| Misfire, tapping noise | Partial valve drop or keeper loss | Sticking lifter, broken rocker | Borescope, valve lash check |
| Turbo failure post-event | Debris ingestion from dropped intake valve | Oiling issue, overspeed | Inspect intake tract, compressor wheel |
How to Prevent a Dropped Valve
Most dropped valves aren’t random. They’re the result of wear, fatigue, or improper maintenance.
- Follow OEM service intervals for valve train inspection, especially on interference engines.
- Use OEM-spec or better components when rebuilding — aftermarket valves or springs with incorrect metallurgy fail faster.
- During head reassembly, ensure keepers are fully seated. A light tap with a plastic mallet and rotation check can prevent future drops.
- Clean valve stem and keeper grooves thoroughly — carbon or debris can prevent proper seating.
- Use a torque wrench and follow OEM bolt tightening sequence. Uneven clamping distorts the head and accelerates wear.
- Inspect valve springs for set (loss of free height) or coil contact marks, especially in high-RPM applications.
- Avoid reusing valve stem seals or guides on high-mileage engines — they contribute to stem wear and potential breakage.
Situation: A 2012 Subaru WRX came in after a sudden shutdown on boost. Customer heard a loud bang. Turbo was smoking.
Initial Assumption: Blown turbo or spun bearing.
Deep Dive/Discovery: Turbo compressor wheel was shattered. But borescope showed a valve head sitting on the piston. Further inspection revealed a fractured exhaust valve stem — fatigue crack at the keeper groove. The turbo ingested debris when the intake valve opened post-failure.
The Nuanced Lesson Learned: Don’t assume turbo failure caused the event — it may be a symptom. Always inspect the combustion chamber first when metal contamination is present.
Situation: A 5.7L Toyota Tacoma wouldn’t start after a recent valve adjustment. Mechanic reported “something stuck.”
Initial Assumption: Timing belt jumped or hydrolock.
Deep Dive/Discovery: Borescope revealed a loose valve retainer in cylinder #3. The keepers hadn’t seated properly during adjustment. The valve dropped on the first start.
The Nuanced Lesson Learned: Even simple procedures like valve lash adjustment carry risk if keepers aren’t verified. A quick rotation by hand before startup could have prevented this.
Situation: A rebuilt 350 Chevy ran fine for 2,000 miles, then knocked violently. Builder swore the clearances were correct.
Initial Assumption: Rod knock from poor assembly.
Deep Dive/Discovery: Rod was bent, but the piston had a large impact mark. The exhaust valve had dropped — root cause was a valve spring that wasn’t seated fully in the pocket, leading to coil bind and fracture at high RPM.
The Nuanced Lesson Learned: Proper spring installed height matters just as much as spring pressure. Measuring isn’t optional — it’s critical.