Yes—a severely dirty air filter can absolutely cause a noticeable loss of engine power. As a master mechanic with 20 years in the field, I’ve seen countless cases where a $15 filter was the root cause of sluggish acceleration, poor fuel economy, and even check engine lights. The fix is simple, but the key is knowing when and how to diagnose it properly. This guide will help you identify, confirm, and resolve airflow restriction issues—saving time, money, and unnecessary part replacements.
How a Dirty Air Filter Reduces Power
Engines need air to make power. A clogged filter restricts airflow into the intake, reducing the amount of oxygen available for combustion. Less air means the ECU injects less fuel—resulting in lower horsepower and torque. The effect is subtle at first but becomes pronounced under load, such as during acceleration or uphill driving.
Modern engines use a Mass Airflow (MAF) sensor to measure incoming air. When the filter is dirty, the MAF reads lower airflow and the ECU adjusts fuel accordingly. The engine runs correctly—but at a reduced capacity. You won’t get a misfire, but you will feel a lack of responsiveness.
In my shop, we always test for airflow restriction before replacing any sensors. More than once, a “bad MAF” turned out to be a filter packed with desert dust. Save your money—start simple.
When Power Loss Becomes Noticeable
A slightly dirty filter won’t hurt performance. Problems typically begin when airflow drops below 50% of normal. You’ll notice symptoms under high engine load:
- Sluggish acceleration, especially merging or passing
- Struggle to maintain speed uphill
- Delayed throttle response in turbocharged engines
Small-displacement and turbocharged engines are more sensitive. A clogged filter on a 2.0L turbo can rob 8–10% of peak power. Naturally aspirated engines lose power more gradually, but still significantly over time.
How to Check for a Dirty Air Filter
Diagnosis starts with a physical inspection, but don’t stop there—especially if symptoms persist after filter replacement.
Step 1: Visual Inspection
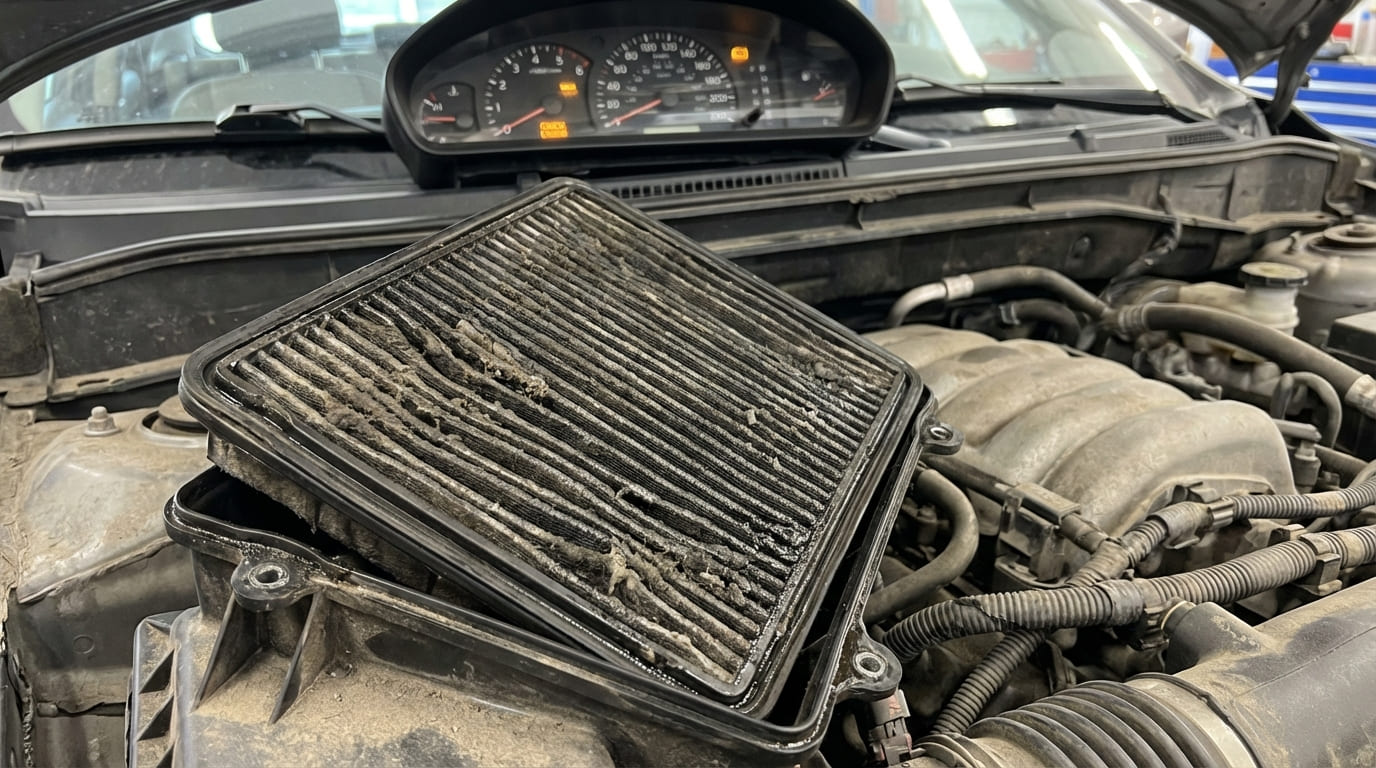
Remove the air filter and hold it up to a bright light. If you can’t see light through most of the pleats, it’s time to replace it. Pay attention to the underside—dirt often accumulates where it’s not immediately visible.
Also inspect the airbox and intake duct. Rodent nests, leaves, or debris can block airflow even with a clean filter.
Step 2: Check for Secondary Symptoms
A restricted filter often causes other issues:
- Rough or unstable idle
- Decreased fuel economy
- Check Engine Light with P0101 (MAF performance), P0171/P0174 (system too lean)
- Whistling or sucking noise from the intake under acceleration
- Black smoke on diesel engines during hard acceleration
Step 3: Use Live Data (For Accurate Diagnosis)
If you have a scan tool, check MAF or MAP sensor readings under wide-open throttle (WOT):
- MAF reading: Use the rule of thumb—0.8 to 1.0 gram per second per liter of engine displacement per 1,000 RPM. Example: A 2.0L engine at 5,000 RPM should read 8.0–10.0 g/s. Significantly lower? Suspect restriction.
- MAP reading (naturally aspirated): At WOT, MAP should reach near atmospheric pressure (101 kPa at sea level). If it’s 15–20 kPa lower, airflow is restricted.
Don’t replace the MAF sensor until you’ve ruled out a dirty filter. I’ve seen customers spend $300 on a new sensor when a $20 filter was the real issue. Always verify airflow first.
Repair vs Replace: Cost and Viability
Replacing a paper air filter is one of the most cost-effective maintenance tasks you can do. Here’s what to expect:
| Part Type | Cost (Part Only) | Lifespan | Maintenance Notes |
|---|---|---|---|
| OEM-style paper filter | $10–$25 | 15,000–30,000 miles | Replace, do not clean |
| Oiled cotton gauze (e.g., K&N) | $50–$120 | 50,000 miles (cleaned every 15k–30k) | Must be cleaned and re-oiled properly—over-oiling damages MAF |
For most daily drivers, I recommend OEM-style paper filters. They’re cheap, effective, and don’t risk MAF contamination. High-flow filters can improve airflow slightly, but only if maintained correctly—most people don’t, and end up with sensor issues.
Common Mistakes to Avoid
- ✅ Do inspect the filter every oil change in dusty environments
- ✅ Do clean the airbox and duct when replacing the filter
- ✅ Do use OEM-spec filters unless you have a modified engine
- ⚠️ Don’t reuse oiled filters without proper cleaning and re-oiling
- ⚠️ Don’t assume a clean-looking filter is flowing well—fine dust can clog deep in the media
- ⚠️ Don’t ignore the intake tract—blockages behind the filter (like rodent nests) are more common than you think
Real-World Diagnoses from the Shop
Situation: 2015 Ford F-150 EcoBoost with P0101 and poor acceleration. Owner replaced the MAF twice.
Fix: Filter looked okay from the top, but the bottom layers were sealed with fine dust. Replaced filter—problem solved. MAF was fine.
Lesson: Always inspect the entire filter depth. Top-down visual checks can miss deep clogs.
Situation: Honda Civic with rough idle, no codes. Filter appeared clean.
Fix: Found a mouse nest behind the filter, blocking 70% of airflow. Removed debris and replaced airbox seal.
Lesson: Inspect the entire intake path—not just the filter. Outdoor-stored vehicles are high risk.
Situation: BMW 335i with lean codes and cold-start misfires. Owner used an oiled high-flow filter.
Fix: MAF sensor coated in oil. Cleaned MAF and replaced filter with OEM type. Problem resolved.
Lesson: Over-oiled filters can ruin MAF sensors. If you use performance filters, follow maintenance strictly.
Long-Term Risks of Ignoring a Dirty Filter
Running with a severely restricted filter for months can lead to secondary damage:
- Turbocharger strain from increased intake vacuum—leads to premature wear
- Higher exhaust temperatures from lean combustion—can damage catalytic converters
- Increased carbon buildup on intake valves (especially in direct-injected engines)
While the engine won’t fail immediately, prolonged restriction accelerates wear and increases repair costs down the line.
Prevention and Maintenance Schedule
Follow these guidelines to avoid performance issues:
- Inspect filter every oil change in dusty or off-road conditions
- Replace paper filters every 15,000–30,000 miles (cut interval in half for severe conditions)
- For oiled filters, clean and re-oil every 15,000–30,000 miles per manufacturer specs
- Always check the airbox seal and ducting for damage or blockage
In my bay, we treat the air filter like a spark plug—simple, cheap, but mission-critical. When a car feels “off,” I check air, fuel, spark, compression—in that order. More often than not, the answer is in the air filter. Don’t overlook the obvious.
| Symptom | Most Likely Cause | Less Common but Possible Causes | Diagnostic Priority |
|---|---|---|---|
| Power loss under acceleration | Severely restricted air filter | Exhaust restriction, fuel pump weakness, turbo wastegate issue | High – inspect filter and intake tract first |
| P0101 (MAF Performance) | Dirty air filter or contaminated MAF | Intake air leaks, faulty MAF, ECU calibration issue | Medium – verify airflow before replacing sensors |
| P0171/P0174 (Lean Codes) | MAF under-reporting due to restriction | Vacuum leak, low fuel pressure, exhaust leak pre-sensor | High – check fuel trims and MAF data together |
| Rough idle | Inconsistent airflow from partial restriction | IAC valve fault, vacuum leak, ignition issue | Medium – rule out major leaks before focusing on filter |
Always consult your vehicle’s service manual for specific replacement intervals and airflow specifications. What works for a diesel pickup may not apply to a small turbo hatchback. But one rule holds true across all engines: clean air in means clean power out.