In my two decades as a shop foreman, I’ve seen more than a few engines come through with cracked blocks—some barely noticeable, others catastrophic. The question I hear often is: “Can I drive it just a little longer?” The short answer: no, not safely. Even a small crack can lead to sudden failure. But before condemning the engine, you need a clear diagnosis. Let’s break down how to assess the risk, test for damage, and decide whether repair or replacement makes sense.
Immediate Risks of Driving with a Cracked Block
Every minute the engine runs with a compromised block increases the chance of total failure. The cylinder block houses combustion pressure, coolant, and oil—all under precise control. A crack disrupts that balance. Here’s what can go wrong:
- Catastrophic engine failure: Cracks often grow under heat and load. If it spreads into a main bearing web or cylinder wall, the engine may seize or spin a bearing.
- Rapid coolant loss: A crack in the coolant jacket can drain the system fast. Aluminum blocks are especially vulnerable—overheating can warp heads or crack further in under 10 miles.
- Oil pressure drop: If the crack intersects an oil gallery, pressure can bleed off. I’ve seen rod bearings fail in minutes once oil pressure drops at idle.
- Internal fluid mixing: Coolant in the oil (milky residue) or oil in the coolant (sludge in the radiator) means internal cross-contamination—often from a block crack.
- Legal and environmental issues: Visible leaks can violate state inspection laws. Plus, dumping coolant or oil on public roads isn’t just irresponsible—it can lead to fines.
In my shop, we never let a customer drive a car with a confirmed block crack—even if it’s “just a hairline.” Thermal cycling expands and contracts the metal, making small cracks grow. One trip to work could be your last with that engine.
How to Diagnose a Cracked Engine Block
Don’t guess. Confirm. Many symptoms mimic a cracked block but stem from cheaper issues like head gaskets or water pumps. Use these tests to isolate the problem.
Step-by-Step Diagnostic Process
Start with visual inspection and work toward pressure-based tests. Always test when the engine is cold and again when hot—some cracks only appear under thermal expansion.
1. Visual Inspection
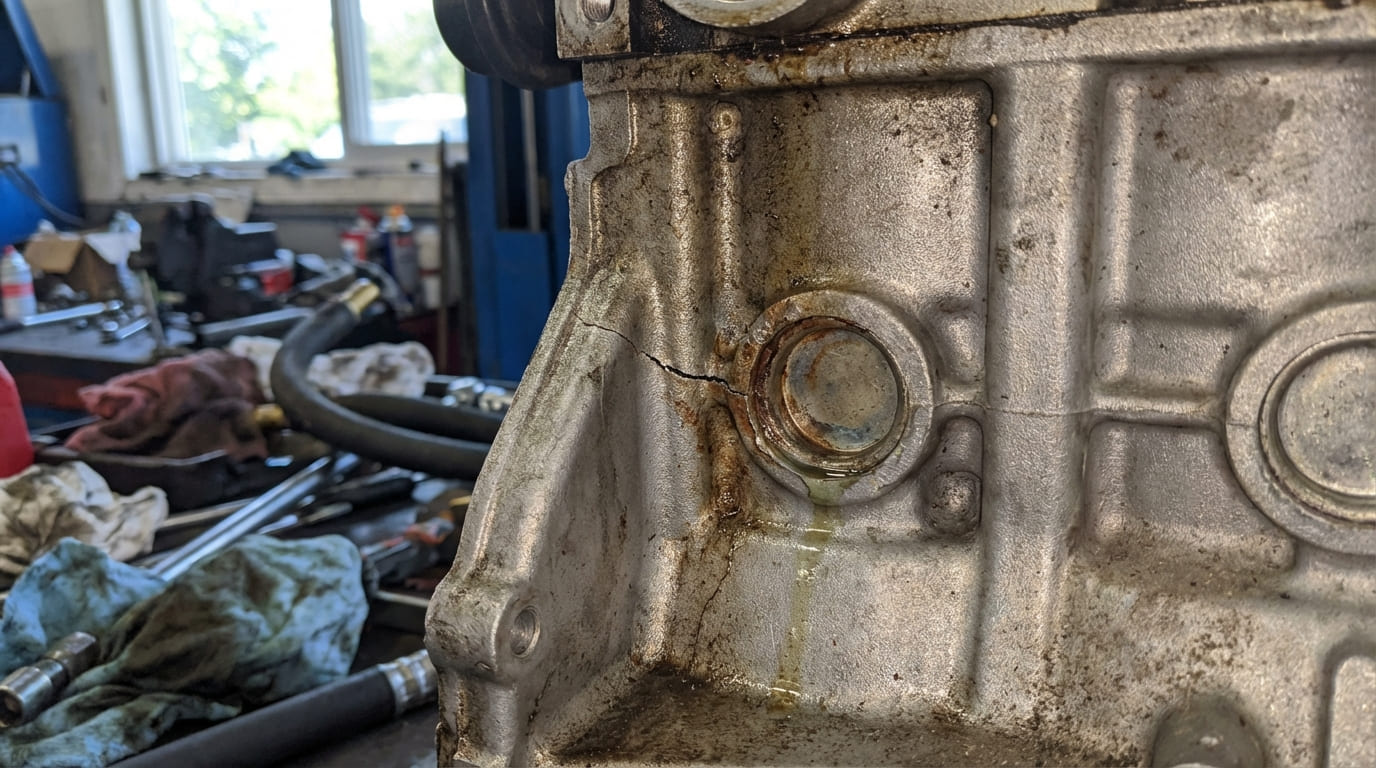
Clean the engine thoroughly with degreaser. Use a bright LED light and inspection mirror or borescope. Look for:
- Wet spots or staining along the block, especially near coolant passages or main caps.
- Carbon tracking (black lines) indicating combustion gas escaping.
- Cracks near high-stress areas: cylinder walls, main bearing saddles, freeze plugs.
2. Dye Penetrant Inspection (DPI)
Best for surface-breaking cracks. Steps:
- Clean the suspect area with solvent.
- Apply red penetrant, wait 15–20 minutes.
- Wipe clean, apply white developer.
- Inspect under good light. Red lines = crack.
Note: DPI won’t detect subsurface cracks. Use it alongside pressure tests.
3. Coolant System Pressure Test
Pump the cooling system to 15–18 PSI (check service manual). Monitor for 20–30 minutes.
- If pressure drops and no external leak is visible, suspect an internal crack.
- Test both cold and hot. Some cracks only leak when expanded.
4. Cylinder Leak-Down Test
With piston at TDC, apply 100 PSI air to each cylinder. Listen for air escaping:
- Into radiator? Coolant system breach.
- Into oil filler? Oil system involved.
- Into adjacent cylinder? Possible crack between bores.
5. Engine Oil Pressure Test
Use a mechanical gauge at the oil pressure sender port. Compare readings at idle and 2,000 RPM to factory specs.
- Low pressure with new pump and filter? Could indicate internal oil leakage via a crack.
| Symptom | Most Likely Causes | Less Common But Possible | Diagnostic Next Step |
|---|---|---|---|
| External coolant leak near block | Cracked block, intake gasket, water pump | Casting porosity, freeze plug failure | Pressure test + borescope |
| Milky oil, no coolant loss | Oil cooler failure, PCV issue | Block crack (oil into coolant) | Check oil cooler, leak-down test |
| White exhaust smoke + coolant loss | Head gasket, cracked head | Block crack into cylinder | Block test, leak-down, dye test |
| Low oil pressure + coolant in oil | Internal oil gallery crack, failed oil cooler | Head gasket breach | Disassembly or borescope |
Situation: A customer brought in a truck with minor coolant loss. No overheating, no visible leaks. Compression was even. I assumed a small radiator cap issue.
Discovery: After a pressure test held steady, I did a leak-down test. At TDC, air was bubbling in the coolant reservoir. Borescope inspection revealed a hairline crack in the deck surface near cylinder #3—barely visible.
Nuanced Lesson Learned: Just because a crack isn’t weeping externally doesn’t mean it’s not active under pressure. Always combine pressure and leak-down tests when coolant loss has no obvious source.
Situation: A 10-year-old sedan came in with white smoke on startup. Coolant level dropped slowly. The shop that diagnosed it said “definitely a head gasket.”
Discovery: Upon teardown, the head gasket was intact. The head was flat. But when we magnafluxed the block, we found a crack running from the coolant jacket into the cylinder bore—caused by a previous overheating event.
Nuanced Lesson Learned: Don’t stop at the most common cause. Even when symptoms point to a head gasket, rule out block and head cracks—especially in engines with a history of overheating.
Can You Repair a Cracked Engine Block?
Repair is possible—but only in specific cases. Most block cracks I see end in replacement. Here’s how I decide.
When Repair Is Not Viable
Avoid repair if the crack:
- Runs into a cylinder bore.
- Extends into a main bearing saddle.
- Causes deck warpage or misalignment.
- Is in a high-compression or turbocharged engine.
These areas bear extreme loads. Any repair here is temporary at best.
Limited Repair Options
For small, non-structural external cracks:
- Welding: Cast iron requires pre-heat (500–1200°F) and slow cooling. Aluminum needs precise TIG welding with compatible filler. Only trust certified shops.
- Crack Stitching: Metal pins are drilled and locked across the crack. Works for low-stress areas but not near bearing caps.
- Post-Repair Testing: Always recheck with DPI and pressure tests.
Cost: $300–$800 depending on method and labor. But weigh this against replacement.
Temporary Fixes: Stop-Leak Products
I don’t recommend them, but in older, low-value vehicles, they can buy time.
- Use sodium silicate-based sealers only for tiny coolant leaks.
- Flush the system first. Clogged heater cores or radiators are common side effects.
- Never use on engines with aluminum blocks or heads—risk of clogging is higher.
Think of it as a bridge to replacement—not a fix.
I’ve used stop-leak once: a 20-year-old farm truck with a tiny weep near a freeze plug. The owner just needed it to last harvest season. I told him to check coolant daily and avoid highway speeds. He made it three months. That’s the only time I’ve seen it work without side effects.
Long-Term Solutions: Replacement Options
For most cracked blocks, replacement is the only safe, lasting fix. Here are your choices:
| Option | Cost Range | Pros | Cons |
|---|---|---|---|
| Remanufactured Long Block | $1,800–$4,000 | Inspected, machined, warranty included | Higher upfront cost |
| Used Engine | $800–$2,000 | Cheaper, OEM parts | Unknown history, may need repairs |
| New Short Block | $1,200–$2,500 | Fresh foundation, reusable heads | Labor-intensive |
I recommend remanufactured long blocks for most daily drivers. They’re reliable and come with a 12- to 24-month warranty. Used engines? Only if you can verify low miles and no accident history. For high-mileage or performance engines, insist on magnafluxing and sonic testing before installation.
Final Recommendations
- ✅ Recommended: Diagnose fully before assuming block failure. Many issues mimic cracks.
- ✅ Recommended: Use factory service manuals for pressure specs and torque sequences—tolerances vary.
- ✅ Recommended: Clean oil and coolant gallery threads with a bottoming tap before reassembly—debris can mask leaks.
- ⚠️ Avoid: Reusing torque-to-yield (TTY) fasteners. They stretch and lose clamping force.
- ⚠️ Avoid: Relying on cold pressure tests alone. Retest when hot.
- ⚠️ Avoid: Driving with a known crack. Even minor leaks accelerate under thermal cycling.
In my experience, the safest approach is to treat any block crack as a serious structural failure. While rare exceptions exist, I’ve found that thorough testing and conservative decisions save more engines—and customers—than risky bets. When in doubt, replace it.