In my shop, I’ve seen more than a few come in with a rough idle or clunking noise, convinced they’ve got a failing transmission or cracked flexplate. More often than not, we end up pointing at something simpler—worn engine mounts. These small components don’t get much attention, but they play a critical role in how your vehicle feels and performs. Over the years, I’ve learned that understanding what engine mounts do—and how they fail—can save you hours of misdiagnosis and unnecessary repairs.
What Engine Mounts Actually Do
Engine mounts secure the powertrain to the chassis while reducing vibration and managing movement. They support the engine’s weight, absorb vibrations from combustion and drivetrain operation, and control how much the engine moves during acceleration, braking, and gear shifts. Without functional mounts, you’ll feel more vibration in the cabin, hear clunks when shifting, and risk damaging other components.
Key Functions You Can Feel
- Hold the engine in place—even under hard acceleration or sudden stops.
- Reduce cabin vibration—especially at idle or steady cruising speeds.
- Stop engine rocking—preventing excessive movement that can strain hoses, wiring, and exhaust.
- Manage torque reaction—resist the engine’s tendency to twist during throttle application.
How to Know If Your Engine Mounts Are Failing
Most mount failures follow predictable patterns. The symptoms are often mistaken for transmission or suspension problems. Here’s how to check—and what to look for.
Common Symptoms and What They Mean
| Symptom | Most Likely Cause | Less Common But Possible Causes | Diagnostic Tip |
|---|---|---|---|
| Clunk when shifting into Drive or Reverse | Failed transmission mount or dogbone mount | Loose subframe bolt, worn engine cradle bushings | Perform load test in Park and Drive; observe engine movement |
| Excessive vibration at idle | Failed hydraulic mount or cracked rubber | Bad spark plug, clogged injector, vacuum leak | Check mounts first—many misdiagnose this as ignition issue |
| Engine lifts visibly under acceleration | Failed upper mount or torque strut | Loose motor mount bracket, modified engine with increased torque | Inspect bracket welds and fastener tightness |
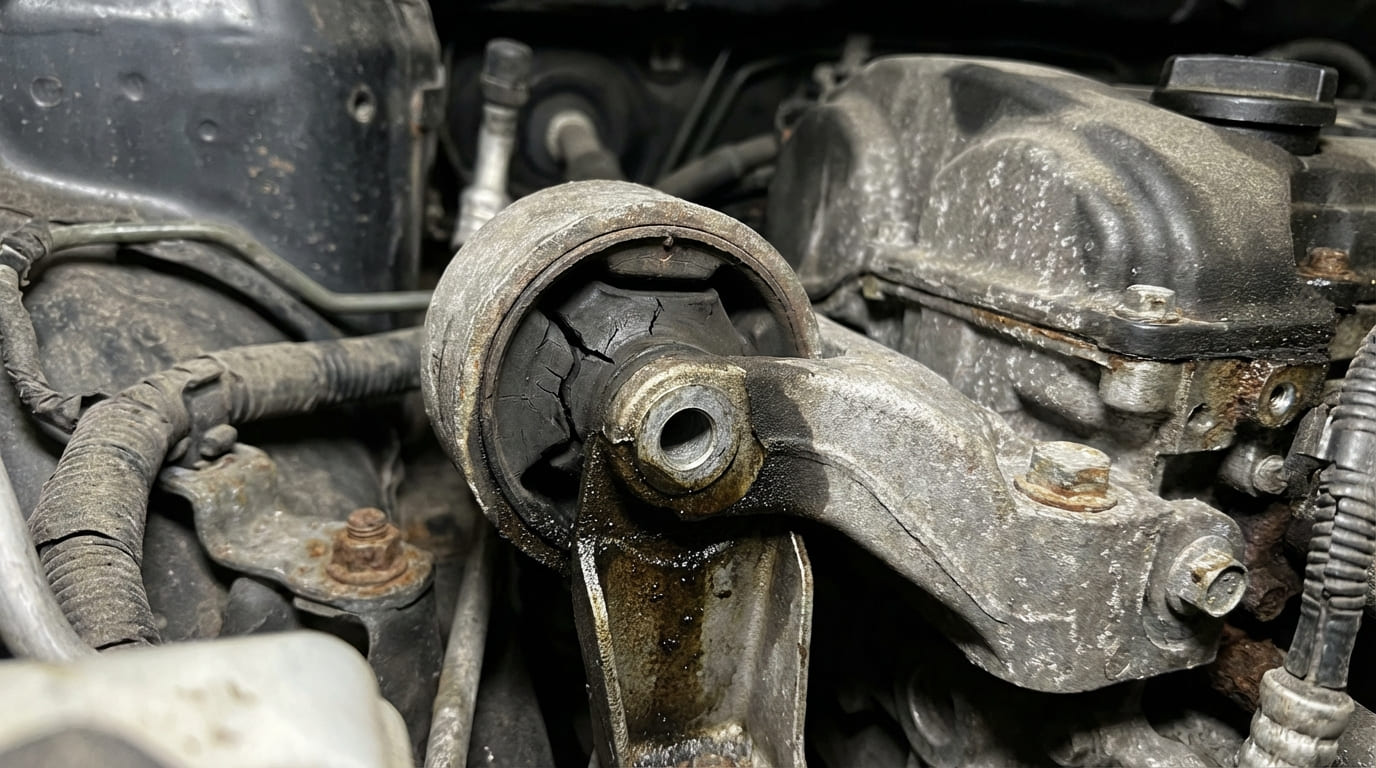
| Oil-soaked or wet mount | Rubber degradation from oil exposure | Oil leak source above (valve cover, oil pan) | Fix the leak first, or new mount will fail prematurely |
How to Check Engine Mounts Yourself
You don’t need a lift to diagnose bad mounts. Here are three proven methods:
1. Visual Inspection
Use a flashlight and mirror to inspect all mounts. Look for:
- Cracks, splits, or separation in rubber
- Collapsed height (reduced gap between metal plates)
- Fluid leaks (dark, oily residue on hydraulic mounts)
- Oil saturation (softened, swollen rubber)
If the rubber is split or the mount is leaking fluid, it’s done.
2. Engine Rocking Test
With the engine running and parking brake on, have a helper shift into Drive and Brake while you watch the engine. Excessive movement—more than 1–2 inches at the valve cover—is a red flag. Be cautious: some engines (like Subarus) naturally move more.
3. Pry Bar Test (Use Caution)
With the vehicle safely raised and supported, use a pry bar with a wood block to gently lever the engine at each mount. If the mount compresses easily, makes noise, or shows internal shifting, it’s failed. Never apply force to aluminum subframes or fragile brackets.
Situation: A 2012 Accord came in with a loud clunk when shifting into Drive. The owner had already replaced the transmission mount, but the noise returned within weeks.
Discovery: During a load test, I noticed the engine lifted sharply on the passenger side. The upper mount looked intact, but a pry bar test revealed internal separation in the rubber—no visible cracks, but zero resistance.
Nuanced Lesson Learned: Not all mount failures are visible. Just because a mount looks okay doesn’t mean it’s functioning. Always test under load, and consider that multiple mounts may share the load unevenly when one fails.
Situation: A customer complained of increased vibration at 1,500 RPM. Scans showed no misfires, and the ignition system tested fine.
Discovery: The front hydraulic mount had a small fluid leak near the base. No collapse, but when I replaced it, the vibration dropped by 80%.
Nuanced Lesson Learned: Hydraulic mounts can fail internally without obvious collapse. Fluid loss reduces damping efficiency, especially at resonant frequencies. Don’t dismiss a mount just because it hasn’t “blown out.”
Types of Engine Mounts and Which to Choose
Mounts vary by design and material. Choosing the right type matters for performance and comfort.
| Type | Pros | Cons | Typical Cost (Part Only) |
|---|---|---|---|
| Elastomeric (Rubber) | Good vibration control, OEM standard, affordable | Wears over time, degrades with oil exposure | $30–$80 |
| Hydraulic | Excellent damping, reduces idle vibration | Can leak fluid, more expensive, harder to source | $80–$180 |
| Polyurethane (Aftermarket) | Reduces engine movement, durable | Increases cabin NVH, harsher ride | $60–$120 |
| Active/Adaptive | Adjusts damping in real time, best refinement | Expensive, complex, requires ECU integration | $150–$400 |
Situation: A turbocharged VW had excessive engine movement under boost. The owner had upgraded to polyurethane mounts, thinking it would help.
Discovery: The poly mounts were fine, but the transmission mount bracket had cracked due to increased torque and lack of compliance.
Nuanced Lesson Learned: Upgrading mounts without considering the entire system can shift stress to weaker components. Sometimes, OEM rubber with hydraulic damping handles modified power better than solid poly.
When to Replace and What to Watch For
Engine mounts typically last 60,000 to 100,000 miles, but driving conditions matter. Taxis, towing, and stop-and-go traffic shorten lifespan. Turbocharged or modified engines add stress. Always inspect mounts during major service work.
Repair vs. Replace: Practical Advice
- Replace mounts in sets if one is bad—others are likely near failure.
- For complex jobs (subframe removal), replace all mounts to save labor.
- Hydraulic and active mounts should be OEM or high-quality aftermarket—cheap copies often fail early.
Cost Overview
Labor varies widely. Simple mounts take 1–2 hours. Others require subframe drops (3–5 hours). Total cost: $200–$800 per mount depending on vehicle and labor access.
Installation Tips from the Shop
- ✅ Support the engine with a jack before removing any mount.
- ✅ Clean bolt threads with a tap—dirty threads give false torque readings.
- ✅ Fix oil or fluid leaks before installing new mounts.
- ⚠️ Never reuse torque-to-yield (TTY) bolts unless specified.
- ⚠️ Don’t over-tighten—can crush rubber or damage aluminum mounts.
- ⚠️ Install with correct orientation—some mounts have front/back markings.
Engine mounts aren’t just rubber blocks—they’re carefully engineered components that balance support, isolation, and durability. While some say “just replace them when they break,” I’ve found that proactive inspection and understanding their role can prevent bigger issues down the road. Always refer to the specific service manual for torque specs, alignment marks, and replacement procedures—because what works on a Camry might not apply to a 3-series.