Diagnostic Pre-Requisites for MAF Sensor Cleaning
Before cleaning, confirm the MAF sensor is actually the issue. Many drivability symptoms mimic MAF failure, but the root cause could be a vacuum leak, fuel delivery problem, or wiring fault. Jumping straight to cleaning without verification wastes time and risks missing serious issues.
Symptoms and How to Check
Common signs of a contaminated MAF sensor include rough idle, hesitation on acceleration, reduced power, poor fuel economy, and a Check Engine Light (CEL). However, these symptoms overlap with other failures. Use this diagnostic checklist:
- Scan for DTCs — focus on P0100–P0104 series
- Check live MAF data (g/s) at key operating points
- Inspect air filter and intake duct for oil, dirt, or damage
- Verify no unmetered air is entering post-MAF
Diagnostic Trouble Codes and What They Mean
OBD2 codes help narrow the issue but don’t confirm contamination. Here’s what each code typically indicates:
| Code | Most Likely Cause | Action Required |
|---|---|---|
| P0100 | Wiring fault, connector issue, or internal sensor failure | Inspect harness, test reference voltage |
| P0101 | Performance deviation — dirty sensor or air leak | Clean MAF, perform smoke test |
| P0102 | Low airflow reading — contamination or restriction | Clean MAF, check air filter, inspect duct |
| P0103 | High input — short circuit or ECU issue | Test wiring, check for chafing near exhaust |
| P0104 | Intermittent signal — loose connector or cracked housing | Wiggle test connector, inspect for damage |
Live Data Analysis: The Real Diagnostic Tool
Live data tells you more than any code. Connect a scan tool and observe:
- Key On, Engine Off: MAF should read 0.0 g/s. Any reading above 0.1 indicates a circuit fault
- Warm Idle: 2–7 g/s depending on engine size. Compare to known-good specs
- 2500 RPM Steady Load: Should scale smoothly to 10–25 g/s
- Fuel Trims: Long-term trims above +10% suggest underreporting airflow (common with dirty MAF)
If readings are erratic, consistently low, or fail to scale, contamination or failure is likely. But always rule out vacuum leaks first — they cause similar symptoms.
Visual Inspection Steps
Remove the intake hose and inspect:
- Air filter: Oily or dirty? Aftermarket oiled filters are a common source of contamination
- Intake duct: Look for cracks, loose clamps, or signs of oil/moisture
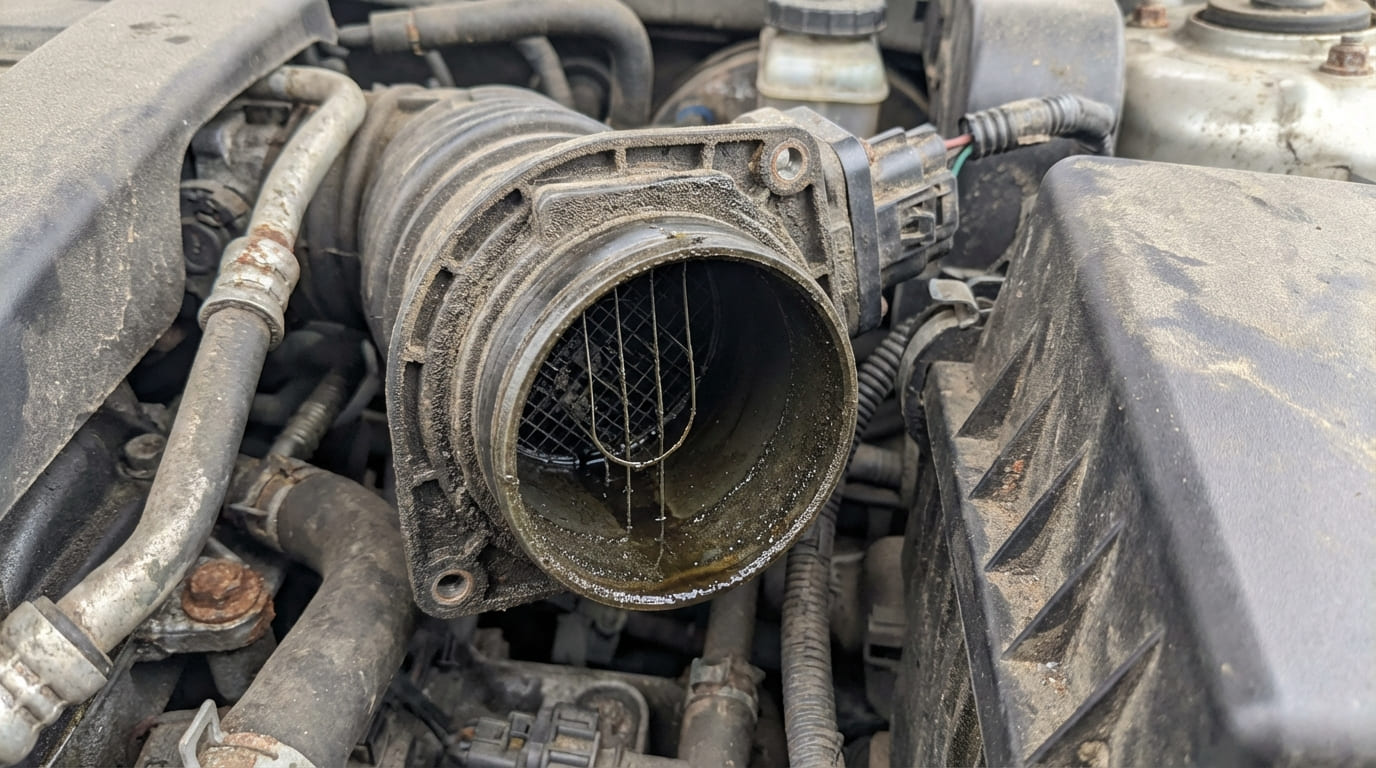
- MAF sensor element: Shine a light — look for dark film (hot-wire) or haze (hot-film)
In my shop, we always check the air filter first. If it’s dripping oil, the MAF will recontaminate in days. Fix the source — don’t just clean the symptom.
Safety Precautions and Preparation
This job is low-risk but mistakes can damage expensive parts. Follow these steps:
- Disconnect the negative battery terminal — prevents shorts during connector handling
- Let engine cool completely — hot intake tubes can warp when loosened
- Work in a ventilated area — MAF cleaner fumes are toxic
- Wear nitrile gloves and safety glasses — protects against chemical exposure and debris
Required Tools and Materials
Using the wrong cleaner destroys sensors. Stick to what works:
| Item | Details | Cost Range |
|---|---|---|
| MAF Sensor Cleaner | Residue-free, non-chlorinated, plastic-safe (e.g., CRC, Mopar) | $8–$12 |
| Screwdrivers / Sockets | For clamps or mounting screws (Phillips, Torx, or hex) | $15–$40 (if not owned) |
| Lint-Free Cloth | Only for exterior housing — never touch sensor element | $5 |
| OBD2 Scan Tool | For code reading, live data, and resetting | $30–$150 |
Never use brake cleaner, carb cleaner, or compressed air. I’ve seen techs ruin $200 sensors in seconds with the wrong spray. When in doubt, read the label: “Safe for MAF sensors” is non-negotiable.
MAF Sensor Removal and Cleaning Procedure
This is a DIY-friendly job taking 20–40 minutes depending on vehicle access.
Step 1: Locate and Remove the MAF Sensor
The MAF is mounted in the intake duct between the air filter box and throttle body. Some models integrate it into the filter housing.
- Disconnect negative battery terminal
- Unclip or unscrew intake duct clamps
- Disconnect electrical connector — press the locking tab, don’t pull the wires
- Remove sensor from duct — twist or slide out as designed
Step 2: Inspect and Clean the Sensor
Hold the sensor by the housing only. Avoid touching the internal element.
- Look for oily residue, dust, or discoloration on the wire/film
- Hold cleaner can 4–6 inches away
- Spray in short bursts until element appears clean
- Let air-dry 5–10 minutes — no wiping, no brushing
- Repeat if heavily soiled (common in off-road trucks)
What NOT to Do
- Do not use compressed air — can bend or dislodge the sensing element
- Do not touch the element — skin oils affect calibration
- Do not soak the housing — moisture can damage internal circuitry
- Do not use shop rags or paper towels — lint sticks and contaminates
Reinstallation and Verification
Improper reassembly causes new problems. Follow these steps carefully.
- Ensure sensor is completely dry — no visible solvent
- Reinstall in correct orientation — match alignment tabs or marks
- Reattach intake duct — snug clamps, do not overtighten
- Reconnect electrical connector — listen for click
- Reconnect battery — positive first, then negative
Post-Cleaning System Reset
The ECU needs to relearn airflow patterns.
- Clear DTCs with OBD2 scanner
- Start engine and let idle for 5 minutes
- Perform drive cycle: idle, accelerate to 55 mph, cruise, decelerate, repeat
- Recheck live data — confirm stable, scaling readings
- Verify CEL stays off over next few days
In my shop, we always clear codes and test drive for at least 10 miles. Some ECUs take multiple drive cycles to complete readiness monitors. Don’t assume it’s fixed after one smooth idle.
Expected Outcome and Troubleshooting
If the Fix Works
You should see immediate improvements: smoother idle, better throttle response, and gradually improving fuel economy. Most genuine MAF contamination issues resolve with cleaning.
If Symptoms Return or DTCs Reappear
Cleaning didn’t fix it? Re-evaluate:
- Perform a smoke test — unmetered air from leaks skews MAF readings
- Inspect wiring harness — look for melted insulation near exhaust, corroded pins
- Test reference voltage (typically 5V) and ground at connector
- Consider replacement — sensors wear out. OEM units last longer than aftermarket
Replacement cost: $120–$300 OEM, $60–$150 aftermarket. On many vehicles, labor is minimal — same as cleaning. If you’ve cleaned it twice with no lasting fix, replace it.
When to Clean — Maintenance Guidance
Factory maintenance schedules don’t include MAF cleaning. Do it only when diagnostics support it.
- Dusty environments or off-road use: Consider cleaning every 30,000–50,000 miles
- Vehicles with oiled air filters: Inspect every 15,000 miles; clean as needed
- Standard daily drivers with dry filters: May never need cleaning
I’ve seen customers clean their MAF every oil change “just in case.” That’s overkill. You’re exposing a sensitive component to unnecessary handling and risk. Clean it when data says so — not on a calendar.
Recommended vs. Avoid
- ✅ Use only MAF-specific cleaner — designed to evaporate cleanly
- ✅ Inspect air filter and intake system first — prevent recontamination
- ✅ Clear codes and monitor live data — confirm the repair worked
- ⚠️ Avoid carb or brake cleaner — chlorinated solvents damage electronics
- ⚠️ Avoid touching the sensor element — oils and force ruin accuracy
- ⚠️ Avoid reusing damaged clamps or cracked ducts — air leaks defeat MAF metering
Real-World Diagnostic Scenarios
Situation: 2012 Honda Accord with P0101. Owner cleaned MAF twice with “electrical cleaner.”
Discovery: Live data showed erratic readings when hot. Harness near exhaust had melted insulation — cleaner had degraded the coating.
Lesson: Wrong cleaner caused collateral damage. Always use MAF-safe products.
Situation: Ford Ranger with cold air intake and oiled filter. P0102 returned after three cleanings.
Discovery: Replaced filter with dry type — problem persisted. Voltage test revealed failing PCM reference signal.
Lesson: Even strong symptoms don’t guarantee a simple fix. Test, don’t guess.
Situation: Toyota Camry with rough idle and high fuel trims. Cleaned MAF — fixed for two days.
Discovery: Smoke test revealed cracked intake elbow downstream of MAF.
Lesson: Unmetered air fools the ECU. Rule out leaks before condemning the sensor.
MAF cleaning can restore performance when done correctly — but it’s not a magic fix. Diagnose with data, clean with care, and verify results. In two decades of diagnostics, I’ve learned this: the sensor is rarely the root cause. It’s usually the messenger.