A broken valve spring disrupts valve timing and sealing, leading to performance loss, noise, and potential engine destruction. This guide cuts through the noise—literally—and delivers a step-by-step approach to diagnosing and confirming valve spring failure, with real-world insights from the shop floor.
How to Diagnose a Broken Valve Spring: A Practical Sequence
Start here: valve spring failure mimics ignition, fuel, and sensor issues. Don’t guess—test. Follow this sequence to isolate mechanical valve train problems efficiently.
Step 1: Listen for Telltale Noises
A sharp, metallic ticking or tapping from the cylinder head—especially one that increases with RPM—is a red flag. Unlike hydraulic lifter tick (which often fades as the engine warms), this noise is erratic and localized. Use a mechanic’s stethoscope or a long screwdriver against your ear to pinpoint the cylinder bank.
Backfiring through the intake or exhaust under deceleration suggests a valve isn’t sealing. Intake pops point to the intake valve; exhaust backfires suggest exhaust valve failure. These symptoms overlap with timing and fuel issues, so don’t stop here—move to testing.
If the engine misfires with a mechanical “clatter” rather than a smooth stumble, suspect the valvetrain. This distinction separates a bad coil from a broken spring.
Step 2: Confirm Misfire Location with OBD2
Scan for P030X misfire codes. Note which cylinder is affected. Use live data to monitor misfire counts under load—cylinders with consistently high counts are prime suspects. But remember: the code tells you *where*, not *why*.
If misfires persist after swapping coils or spark plugs, the issue is likely mechanical. Move to compression testing.
Step 3: Perform a Compression Test
Remove the spark plug and install a compression gauge. Crank the engine 4–5 revolutions and record the reading. Compare across all cylinders.
- Healthy engines: 140–170 psi (check factory specs for your model)
- Concern: a cylinder reading more than 25% lower than its neighbors
Low compression indicates a sealing issue—could be rings, head gasket, or valves. A broken valve spring prevents the valve from closing, so it’s high on the list if other causes are ruled out.
Step 4: Conduct a Leak-Down Test
This is the gold standard for diagnosing valve sealing issues. Bring the suspect cylinder to TDC on the compression stroke and apply 100 psi of regulated air.
Listen for where the air escapes:
- Intake tract → intake valve not sealing
- Exhaust pipe → exhaust valve issue
- Oil filler cap → piston ring leakage
- Coolant reservoir → head gasket breach
A rhythmic pulsing of air through the intake or exhaust—synchronized with crank rotation—points to a valve not seating due to weak or broken spring tension.
Step 5: Visual Inspection Under the Valve Cover
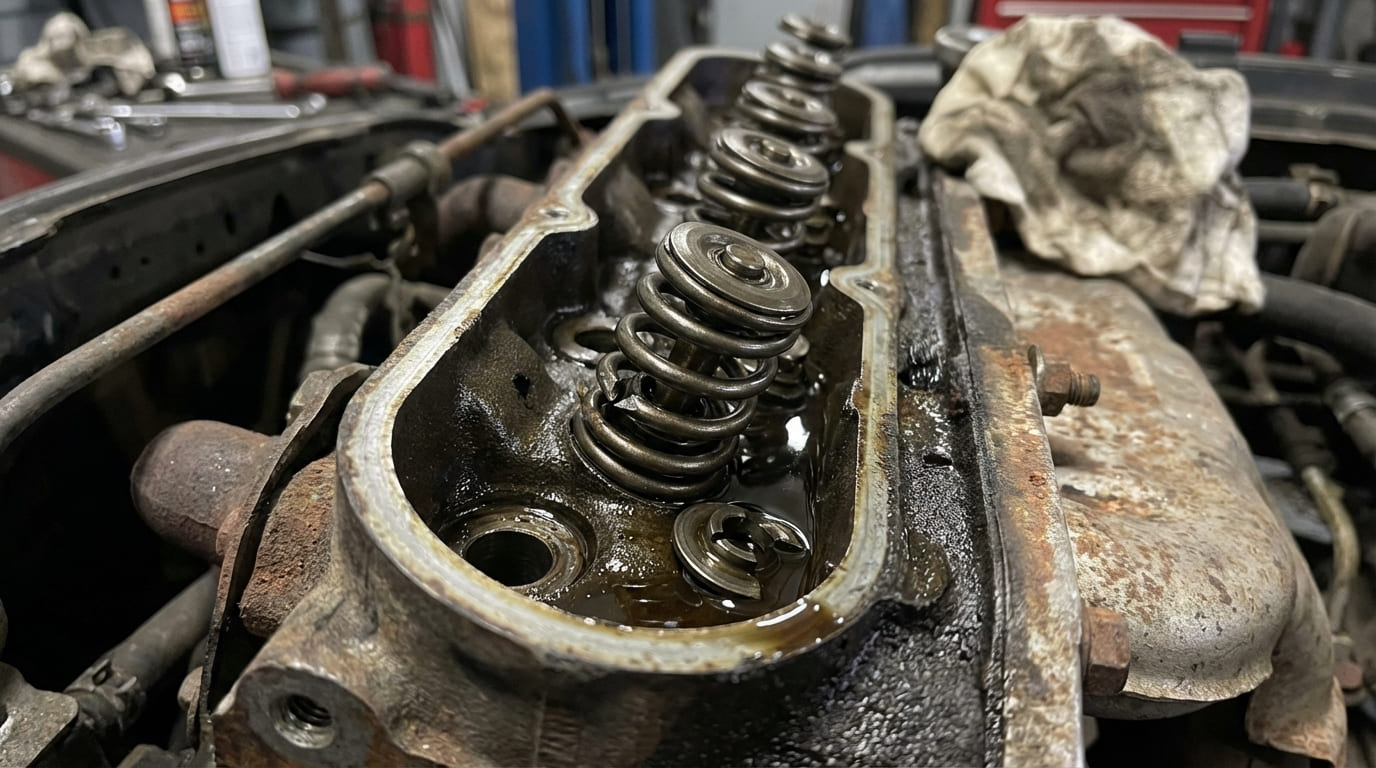
Remove the valve cover and rotate the engine slowly by hand. Watch the rocker arms and valve movement on the suspect cylinder.
Look for:
- Fractured or collapsed spring coils
- Loose or dislodged valve spring retainer
- Valve that doesn’t fully close
- Bent pushrod, worn cam lobe, or collapsed lifter (rule these out too)
In dual-spring setups (common on performance engines), inspect both inner and outer springs. One may be broken while the other appears intact.
In my shop, we always perform a leak-down test before opening the valve cover. It confirms the valve isn’t sealing and tells us which one—intake or exhaust—so we know exactly what to look for when we open it up.
Symptom Analysis: What You’re Seeing and Hearing
| Symptom | Most Likely Causes | Probability Estimate | Notes |
|---|---|---|---|
| Single-cylinder misfire + ticking noise | Broken valve spring, bent valve, worn cam lobe | High (60–70%) | Visual inspection often confirms; check for retainer movement |
| Backfiring through intake | Intake valve not sealing (spring, guide, or stem) | Moderate (50%) | Also consider timing issues or lean fuel trim |
| Rough idle + low compression | Valve spring, head gasket, piston rings | Variable (40–60%) | Leak-down test helps differentiate; location of air loss is key |
| Oil consumption + valve train noise | Valve stem seal damage, spring failure, guide wear | Low–Moderate (30%) | Often a secondary effect; inspect seals during repair |
What Happens If You Keep Driving?
A broken valve spring isn’t just a performance issue—it’s a ticking time bomb.
Risk of Valve-to-Piston Contact
If the valve fails to close, it can remain open as the piston rises. At high RPM, this causes catastrophic collision. Result? Cracked pistons, bent valves, damaged cylinder walls. Rebuild or replacement follows—cost: $2,500–$6,000+.
Even at idle, repeated contact destroys components. If you hear metallic knocking under load, shut the engine off.
Secondary Damage to Valvetrain
Abnormal valve motion overloads rocker arms, pushrods, and cam lobes. I’ve seen bent pushrods and chipped rocker tips from just a few hundred miles of driving. Repair cost jumps fast when multiple parts fail.
On a 2008 V8 pickup with P0305 and ticking, we assumed lifter noise—common on that model. Compression was low, leak-down showed exhaust leakage, and the valve cover revealed a cracked exhaust spring. Lesson: don’t let common failures blind you. Test first.
A high-mileage inline-6 had intake puffing and misfires. Leak-down showed 20% loss into the intake. Spring wasn’t broken—but coils were compressed from fatigue. Lesson: a spring can fail without fracturing. Measure free length and pressure if in doubt.
A track-driven V8 backfired like a lawn mower. Leak-down revealed air escaping both intake and exhaust on one cylinder. The outer valve spring was broken; inner was intact but overwhelmed. Lesson: in dual-spring setups, inspect both. One failure compromises the system.
Root Causes and How to Prevent Recurrence
Replace the broken spring, yes—but also ask: why did it fail?
- Material fatigue: Common over 150k miles, especially with aggressive cams or frequent high-RPM use.
- Over-revving: Causes valve float and shock loading. Stock engines rarely float, but failed rev limiters or manual shifting errors can do it.
- Manufacturing defect: Rare, but if multiple springs fail early, suspect batch issues.
- Corrosion: Salt or moisture accelerates coil-end breakage. Inspect springs in coastal or winter climates.
- Wrong spring or improper install: Incorrect pressure, height, or seating causes premature failure. Always use OEM-spec or performance-grade replacements.
Always inspect all valve springs when one fails—especially in high-mileage engines. I’ve replaced a single spring only to have a neighboring one break two weeks later. On performance builds, replace the entire set.
Repair vs. Replace: Cost and Practicality
Valve spring replacement requires valve cover removal and often spring compressors. Labor: 3–6 hours depending on engine design.
| Component | Part Cost | Notes |
|---|---|---|
| Single valve spring (OEM) | $15–$40 | Often sold in sets; verify fit |
| Full set (performance) | $120–$300 | Recommended for high-stress applications |
| Valve spring compressor tool | $40–$100 | Rentable; essential for safe service |
| Dealership labor (6 hours) | $600–$1,200 | Independent shop: $300–$700 |
If the engine has suffered valve-to-piston contact, costs skyrocket. Rebuilding may exceed the vehicle’s value—especially on older models.
Recommended Practices and Pitfalls to Avoid
- ✅ Use a torque wrench and follow factory sequence on valve cover and rocker arm bolts. Prevents warping and uneven valve lash.
- ✅ Clean gasket surfaces and spark plug tube seals thoroughly. Prevents oil leaks that mimic other issues.
- ✅ Tap bolt holes and clean threads. Corrosion or old thread locker causes false torque readings and stripped holes.
- ⚠️ Never reuse torque-to-yield (TTY) bolts unless specified. They stretch and lose clamping force.
- ⚠️ Don’t assume isolated failure. Inspect all springs if one broke early.
- ⚠️ Never skip the leak-down test. It tells you where compression is lost—critical for accurate diagnosis.
Always consult factory service data for your engine’s spring height, pressure specs, and torque procedures. One size doesn’t fit all—even within the same engine family.